Archives

Scarves to Dye For: class/tutorial

Scarves to Dye For: 2 lessons/$30.00

scarves to dye for
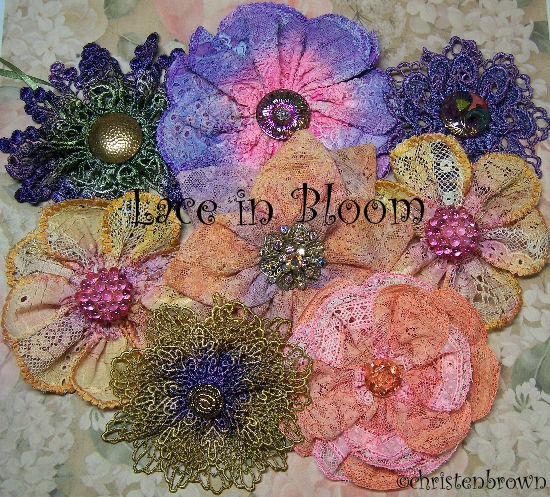
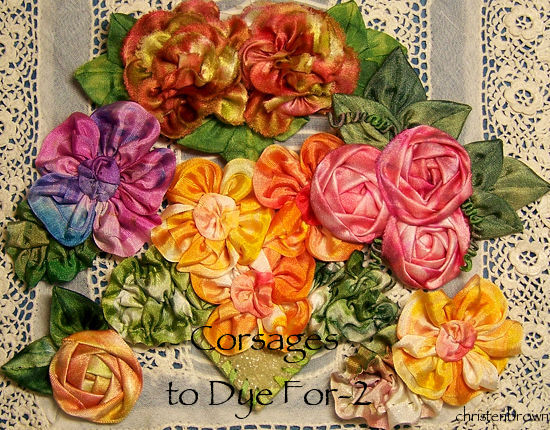
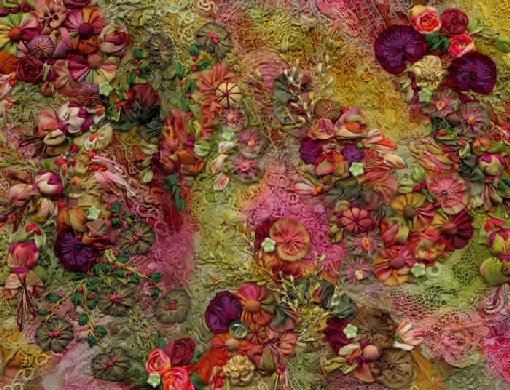
Do you find yourself wishing “if only I had scarf that had all of my favorite colors in it”? If your answer is YES, then let me invite you to take a colorful journey into the realm of dyeing your own RTD (ready to dye) scarves, lace and silk ribbons. I will teach you how to prepare your scarf blank, the lace and ribbons then dye them to create one of a kind, creative and colorful wearable masterpiece! In this class you will be using Colorhue Dyes, no other dye will be discussed

Skill Level Beginning/Intermediate: hand sewing and ribbonwork knowledge helpful.

Lesson 1: I will give you a few simple resist dye techniques that include tied, stitched and wrapped that can be used on the scarf blanks, ribbons and lace. I will show you how to prepare the dye baths, and give you color formulas to work from.

Lesson 2: First you will hand stitch the lace to the edges of the scarf. Then you will transform your ribbons into the flowers and leaves of your choice. These will be turned into finished vignettes that can be pinned or attached to the scarf bases.

Class Information

These classes can be purchased at any time, there is no set schedule. The class can be ordered by contacting Christen: thestoreonthecorner@gmail.com. She will send you an invoice through PayPal.

Once the class is paid for, the supply list will be sent out. The lessons will begin one week after the purchase of the class, unless otherwise stated. You will receive an email with the lesson attached. The following lesson/s will arrive one week after the previous lesson.

A high speed internet connection is recommended, and you must have basic computer and internet skills. You will need to be able know how to download and save a document to your computer’s hard drive, open it and print out a copy.

You can contact Christen with any questions pertaining to the class/class information throughout the length of the class.

Class fees will not be refunded.

Happy Stitching,

~Christen

Lace in Bloom: class/tutorial

Lace in Bloom: 2 lessons/$25.00

lace in bloomAre you the frilly type of girl, who loves lace, blossoms and corsages? In this class I will show you a few different techniques that will take bits of lace and magically transform them into five different blooms. The techniques include individual pieces cut or folded into a petal, then sewn into a flower. Another technique is similar to my Scrumptious Scrap classes, creating a length of scrumptious bits that is turned into a flower. Then some easy peasy rosettes are created with lengths of Viennese lace and ribbon. Each of the blooms is finished off with buttons or a bit of bling. These will make wonderful gifts! Colorhue dyes will be used in this class; no other dyes will be discussed.

Skill Level Beginning/Intermediate: some machine and hand-sewing knowledge helpful

dyed lace flowers Lesson 1: This class will transform your bits of lace into a fabric mesh or strip of fabric to be cut into petals. Then you will dye these pieces and the other lengths of lace that will be used for flowers.

dyed lace flowersLesson 2: In this class you will transform your dyed laces into beautiful one-of-a-kind blossoms, using a few different petal shapes and techniques. The flowers include Claire de Lune, Pretty Petals, Scrumptious Petals, Lace Rosettes and Frilly Double Rosettes.

Class Information

These classes can be purchased at any time, there is no set schedule.The class can be ordered by contacting Christen: thestoreonthecorner@gmail.com. She will send you an invoice through PayPal.

Once the class is paid for, the supply list will be sent out. The lessons will begin one week after the purchase of the class, unless otherwise stated. You will receive an email with the lesson attached. The following lesson/s will arrive one week after the previous lesson.

A high speed internet connection is recommended, and you must have basic computer and internet skills. You will need to be able know how to download and save a document to your computer’s hard drive, open it and print out a copy.

You can contact Christen with any questions pertaining to the class/class information throughout the length of the class.

Class fees will not be refunded.

Happy Stitching,

~Christen

Kelp Scarf: class/tutorial

Kelp Scarf: 2 lessons/$25.00

machine stitched threads and yarnsThis is truly a one of a kind scarf, that you can make with practically any fiber that you have on hand. You will make a stitched “mesh” using a Solvy base, and strips and scraps of fabric, decorative yarns, ribbons and metallic or rayon threads. The result will be a lightweight, colorful scarf that can be worn all year round. Fringe can be added at the ends for extra flare.

Skill Level Beginning: sewing machine knowledge needed

Lesson 1: In this class you will learn about working with rayon and metallic threads and using these to make your “mesh”. I will give you ideas on how to cut or strip your fabric, then stitch these onto the base.

Lesson 2: In this class I will show you how to incorporate the decorative yarns and ribbons to further enhance your scarf. The last step is to add the fringe and voila you are done!

Class Information

These classes can be purchased at any time, there is no set schedule.The class can be ordered by contacting Christen: thestoreonthecorner@gmail.com. She will send you an invoice through PayPal.

Once the class is paid for, the supply list will be sent out. The lessons will begin one week after the purchase of the class, unless otherwise stated. You will receive an email with the lesson attached. The following lesson/s will arrive one week after the previous lesson.

A high speed internet connection is recommended, and you must have basic computer and internet skills. You will need to be able know how to download and save a document to your computer’s hard drive, open it and print out a copy.

You can contact Christen with any questions pertaining to the class/class information throughout the length of the class.

Class fees will not be refunded.

Happy Stitching,

~Christen

Fabulucious Felt Florals: class/tutorial

Fabulucious Felt Florals: 2 lessons/$25.00fabulouciousfiberflowers2

These fast and easy flowers are just fun, fun, fun! Create a brooch, hair ornament, or decorate an object with these colorful, creative floral beauties. Several different flowers, leaves and embellishments will be made using a variety of shapes with the addition of machine and hand embroidery.

Skill Level Beginning: sewing machine knowledge needed

Lesson 1: In this class you will learn to make these flowers: Encircled, Sweet 16, Bull’s Eye Button, Hello Dolly, Rolled Roses, with various leaves and centers.

Lesson 2: In this class you will learn to make these flowers: Panzy, Petalina, Dessert Rose, Carnation, Madrigal Marigold with various leaves and centers.

Class Information

These classes can be purchased at any time, there is no set schedule.The class can be ordered by contacting Christen: thestoreonthecorner@gmail.com. She will send you an invoice through PayPal.

Once the class is paid for, the supply list will be sent out. The lessons will begin one week after the purchase of the class, unless otherwise stated. You will receive an email with the lesson attached. The following lesson/s will arrive one week after the previous lesson.

A high speed internet connection is recommended, and you must have basic computer and internet skills. You will need to be able know how to download and save a document to your computer’s hard drive, open it and print out a copy.

You can contact Christen with any questions pertaining to the class/class information throughout the length of the class.

Class fees will not be refunded.

Happy Stitching,

~Christen

Corsages to Dye For II: class/tutorial

Corsages to Dye for II: 3 lessons/$38.00

dyed ribbon corsagesDo you find yourself wishing “if only I had a ribbon that was this color or that”, or “why didn’t it come in my favorite colors”? If your answer is YES, then let me invite you to take a colorful journey into the realm of dyeing your own RTD (ready to dye) silk ribbons. I will teach you how to prepare your ribbons then dye them to create one of a kind, creative and colorful ribbons. These ribbons will then be turned into magical works of floral art for your own “corsages to dye for”!

Skill Level Intermediate: hand sewing and ribbonwork knowledge helpful

Lesson 1: This class you will learn how to mix the Colorhue dyes (no other dye will be used or discussed); you can use the basic color wheel or create your own colors. You will learn a series of techniques to prepare the ribbon for dyeing, then dyeing the ribbons that you will use in the next lessons. I will also cover over-dyeing and “antique coloring” of the dyed ribbons.

Lesson 2: This class will focus on making the flowers: the Chou Rose, the Country Rose, and the Lady Ashley Rose. I will show you design options for each flower, from a single flower to a group of flowers. Which corsage you decide to make is up to you.

Lesson 3: This class will focus on making the leaves from the ribbons that you have dyed, then stitching all of the components together into the corsages.

*Note: The Corsages to Dye For series need not be taken in order. In each class you will learn how to prepare the dyes; and each lesson will cover a different set of preparation techniques to create the colorful patterns in the ribbons.

Class Information

These classes can be purchased at any time, there is no set schedule.The class can be ordered by contacting Christen: thestoreonthecorner@gmail.com. She will send you an invoice through PayPal.

Once the class is paid for, the supply list will be sent out. The lessons will begin one week after the purchase of the class, unless otherwise stated. You will receive an email with the lesson attached. The following lesson/s will arrive one week after the previous lesson.

A high speed internet connection is recommended, and you must have basic computer and internet skills. You will need to be able know how to download and save a document to your computer’s hard drive, open it and print out a copy.

You can contact Christen with any questions pertaining to the class/class information throughout the length of the class.

Class fees will not be refunded.

Happy Stitching,

~Christen

Corsages to Dye For I: class/tutorial

Corsages to Dye for I: 3 lessons/$38.00

dyed ribbonDo you find yourself wishing “if only I had a ribbon that was this color or that”, or “why didn’t it come in my favorite colors”? If your answer is YES, then let me invite you to take a colorful journey into the realm of dyeing your own RTD (ready to dye) silk ribbons. I will teach you how to prepare your ribbons then dye them to create one of a kind, creative and colorful ribbons. These ribbons will then be turned into magical works of floral art for your own “corsages to dye for”!

Skill Level Intermediate: hand sewing and ribbonwork knowledge helpful

Lesson 1: This class you will learn how to mix the Colorhue dyes (no other dye will be used or discussed); you can use the basic color wheel or create your own colors. You will learn a series of techniques to prepare the ribbon for dyeing, then dyeing the ribbons that you will use in the next lessons. I will also cover over-dyeing and “antique coloring” of the dyed ribbons.

Lesson 2: The second class will focus on making the flowers: the Rose and Bud; Butterflies Delight; and the Harlequin flower. I will show you options on how to use each flower, from a single flower to a group of flowers. Which corsage you decide to make is up to you.

Lesson 3: The third lesson will focus on making the leaves from the ribbons that you dyed, then stitching all of the components together for each corsage.

*Note: The Corsages to Dye For series need not be taken in order. In each class you will learn how to prepare the dyes; and each lesson will cover a different set of preparation techniques to create the colorful patterns in the ribbons.

Class Information

These classes can be purchased at any time, there is no set schedule.The class can be ordered by contacting Christen: thestoreonthecorner@gmail.com. She will send you an invoice through PayPal.

Once the class is paid for, the supply list will be sent out. The lessons will begin one week after the purchase of the class, unless otherwise stated. You will receive an email with the lesson attached. The following lesson/s will arrive one week after the previous lesson.

A high speed internet connection is recommended, and you must have basic computer and internet skills. You will need to be able know how to download and save a document to your computer’s hard drive, open it and print out a copy.

You can contact Christen with any questions pertaining to the class/class information throughout the length of the class.

Class fees will not be refunded.

Happy Stitching!

~Christen

Beadazzled Somemore Purse: class/tutorial

Beadazzled Somemore Purse: 4 lessons/ $45.00

beads stitched to fabric

This class delves deeply into the wonderful world of bead embellishment, exploring a wide variety of stitches and embroidery techniques. The sample that you will be stitching on can become a purse (using the pattern provided), a pillow or wall hanging, or whatever you choose. The techniques that will be covered are free-form peyote on fabric, free form bead embroidery, multi bead embroidery, attaching trinkets, buttons and charms with beads, and so much more. Your project will start with a beautiful batik fabric, a variety of seed beads in several sizes and colors combined with a collection of buttons, glass charms and larger beads. This class is a must for anyone who loves beads!

Skill Level Intermediate: sewing machine and beading knowledge needed

Lesson 1: This class will cover how to prepare the base fabric, with a small amount of machine stitching to secure the layers of fabric and batting. We will talk about design choices, color choices and bead choices, and how to prepare your beads for easy set up.

Lesson 2: This class we will explore the basic peyote stitch; changing between bead sizes within the beginning row, adding to this row, making connections and creating additional rows.

 Lesson 3: This class will cover filling in areas with additional rows, multi-bead embroidery.

 Lesson 4: This class will cover filling in areas with larger glass beads and charms, adding in sequins, buttons and chips. I will also cover how to assemble the purse and additional finishing touches that can be added to your project.

Class Information

These classes can be purchased at any time, there is no set schedule.The class can be ordered by contacting Christen: thestoreonthecorner@gmail.com. She will send you an invoice through PayPal.

Once the class is paid for, the supply list will be sent out. The lessons will begin one week after the purchase of the class, unless otherwise stated. You will receive an email with the lesson attached. The following lesson/s will arrive one week after the previous lesson.

A high speed internet connection is recommended, and you must have basic computer and internet skills. You will need to be able know how to download and save a document to your computer’s hard drive, open it and print out a copy.

You can contact Christen with any questions pertaining to the class/class information throughout the length of the class.

Class fees will not be refunded.

Happy Stitching!

~Christen


Tassels, The Ultimate Furniture Jewelry

I have always loved tassels, and my home is filled with these lovely adornments. Here are a few of the unique tassels that I created for classes or just myself.

Persephone’s Bell

This floral tassel definitely belongs in a fairy tale. The top of the tassel is a dyed gourd; the tassel itself is made from wire ribbon formed into gorgeous fuchsias. Wire leaves and silk flowers are also made to enhance the piece. Beads and charms and ribbon worked leaves complete the tassel, adding a silk cord to hang from your fairy garden trellis.

Morning Glory Tassel

The Morning Glory Tassel showcases the many different types of ribbons that I carry in my store. The tassel top was made from a cardboard tube covered with vintage jacquard ribbon. The top was then embellished with hand made flowers and ribbons from the French Wire Ribbon section. The tassel fringes are made from the Hanah Silk Ribbons, 7mm silk ribbon, gauze ribbon and novelty yarns.

Cotillion Tassel

cotillion tassel, ribbonwork, ribbon flowers, ribbon, beads

A very feminine addition to any space inhabited by a woman, perhaps hung on her boudoir mirror or sewing room. The base of the tassel is covered with a small bit of tapestry fabric that is adorned with velvet ribbons and charms. Jacquard ribbons and silk cords are stitched with beads and more ribbon and dangle from the base. These dangles are encrusted with beads and charms. The stem of the silk cord becomes a very stylized fuchsia made from French wire ribbon.

Parisian Couture Tassel

Ribbons and beads are combined to create a magical, colorful, embroidered and festooned tassel. French jacquard ribbon is stitched onto a base with embroidery and beads, which is used for the tassel top. The fringe is a luscious array of Hanah silk bias ribbons combined with beads.

Floral Pastoral Tassel

Floral Pastoral Tassel showcases the many different types of ribbon and their versatility. The tassel top was made from machine stitched cotton paper, reinforced with Timtex, stitched by machine and formed into the shape. The tassel top was then embellished with hand made flowers and ribbons from the Crazy Quilt Ribbon section and our French Wire Ribbon section. The lace and some of the ribbons were hand dyed using the Color Hue dyes. The tassel fringes are made from the Hanah Silk Ribbons. A sprinkling of silk ribbon embroidery and glass beads were added for extra sparkle.

Hope that your home is filled with treasures too!

Enjoy~ Christen

Friday’s Favorites: Hearts, Hearts and Hearts

Hearts in all shapes and sizes have always been a favorite of mine.

These old heart shaped tin molds were a thrift store find, one that I just treasure. I picked up the myriad of Valentine’s day themed ribbon in the dollar section at Target. Too cute!

Rose Heart is a combination of two techniques from my new book, Ribbonwork Gardens. The heart shape is made from French wire ribbon, and the rose is made from hanah silk ribbon. This is a small corsage.

This is an embroidery sampler, showcasing traditional embroidery stitches worked in both perle cotton and cotton floss. This can be found in my book, Hand Embroidery Stitching, by C&T Publishing.

Here are my magical heart shaped tin molds full of my favorite mother-of-pearl buttons.

The base of this “Hanky Heart” is made from an old handkerchief that had ripped in several places. I hand-dyed what was left of the handkerchief, then hand pieced it into this heart shape. I covered the seems of the raw edges with hand-dye vintage lace. I then stitched a few ribbonwork flowers, and ribbon embroidery into this pretty little vignette.

This is a grouping of  heart shaped bases, covered in vintage and new plastic buttons. The base is made from Timtex, then covered in a cotton muslin. Then the buttons are stitched down with pearl cotton. Fun, fun, fun….

Here are my heart shaped tin molds full of vintage and new heart shaped buttons (of course). The background is a piece of sheet music from the play Don Quixote.

And as far as I am concerned, you can never have too many HEARTS!

I hope that you enjoy your day, think good thoughts, and forever stay young and curious…

Happy Stitching to you! ~Christen

Friday’s Favorites: Silk Ribbon Embroidery with Ribbon Worked Flowers

Friday’s Favorites (and every day for me) are silk ribbon embroidery projects that include ribbon worked flowers and leaves. This type of work incorporates two different techniques, embroidery with silk ribbon and flower or leaves stitched from ribbon. If you are unfamiliar with these techniques it can be confusing to identify one technique over the other.

In the above image I have used both silk ribbon embroidery and ribbon worked flowers made from silk habotai and silk satin ribbons. The base of this particular piece is composed of precious bits and pieces of lace that are stitched to a base of silk fabric, then dyed along with a few of the ribbons used for the flowers. The silk ribbon embroidery was stitched with 2mm, 4mm, and 7mm silk ribbon.

silk ribbon embroidery
Marie’s Boudoir Pillow

This pillow is an example of silk ribbon embroidery. In this technique a needle (chenille) is threaded with silk ribbon, and is then stitched through the fabric to create the embroidered designs. All of the stitches were stitched with silk embroidery ribbon, in sizes 2mm, 4mm, 7mm, and 13mm, and silk buttonhole twist and stranded floss.

ribbon worked flowers and leaves
Violet Gardens

This brooch is an example of flowers and leaves made from ribbon. These ribbonworked flowers are stitched from ribbon in sizes 1/4″ to 5/8″, in a variety of styles and fiber content. Ribbonwork differs from embroidery because the individually stitched flowers are created by threading a needle with sewing thread, cutting the ribbon the exact length for each flower, then stitching the ribbon to form the flower. Each flower or leaf  is then stitched in place with a needle and thread.

silk ribbon embroidered brooch
Elizabeth’s Garden

This is an example of a brooch that is embroidered with silk ribbon and silk threads, with a few ribbon worked flowers and leaves added to the top outside portion of the brooch. I have also incorporated a rococo trim around the outer edge of the brooch.

silk fabric with silk ribbon embroidery
Summer Blossoms Purse

This purse is an example of silk ribbon embroidery on an embroidered silk fabric with silk dupioni fabric on the outer edges. One of the wonderful qualities of silk is that it takes the dye so beautifully, and is very vibrant, yet still feminine. What makes silk embroidery ribbon so lovely is that it is beautiful even when worked in the most basic stitches such as lazy daisy, straight, and French knot stitches.

silk ribbon worked flowers and leaves
Silk Gardens Purse

This purse appeared in the March/ April 2007 issue of PieceWork Magazine. I wrote an article on silk fabrics, and this piece was included as a project. Here I have combined both ribbonworked flowers and a few silk ribbon embroidered stitches.

Happy Stitching to you! ~Christen