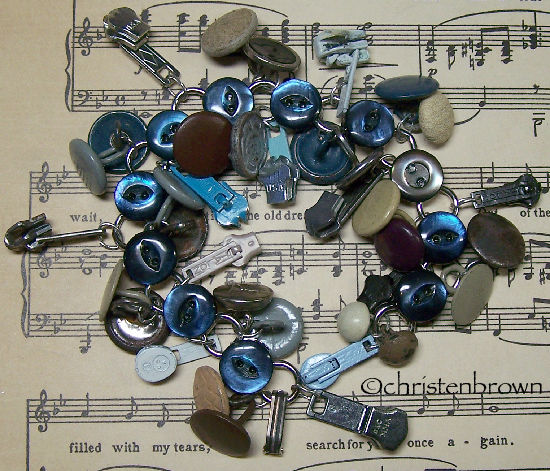
What more can I say? I love, love, love buttons, I am not sure that I love anything in my work room more than my buttons! Unless my hubby or daughter are in there!
I chose a few of my favorite types of buttons to share, then pieces that I used these types of button on. The finished pieces that I am sharing today all come from my book, Creative Embroidery, Mixing the Old With the New, by C&T Publishing.
Here is an example of some of my crochet buttons. The pieces below all have some form of thread covered buttons.
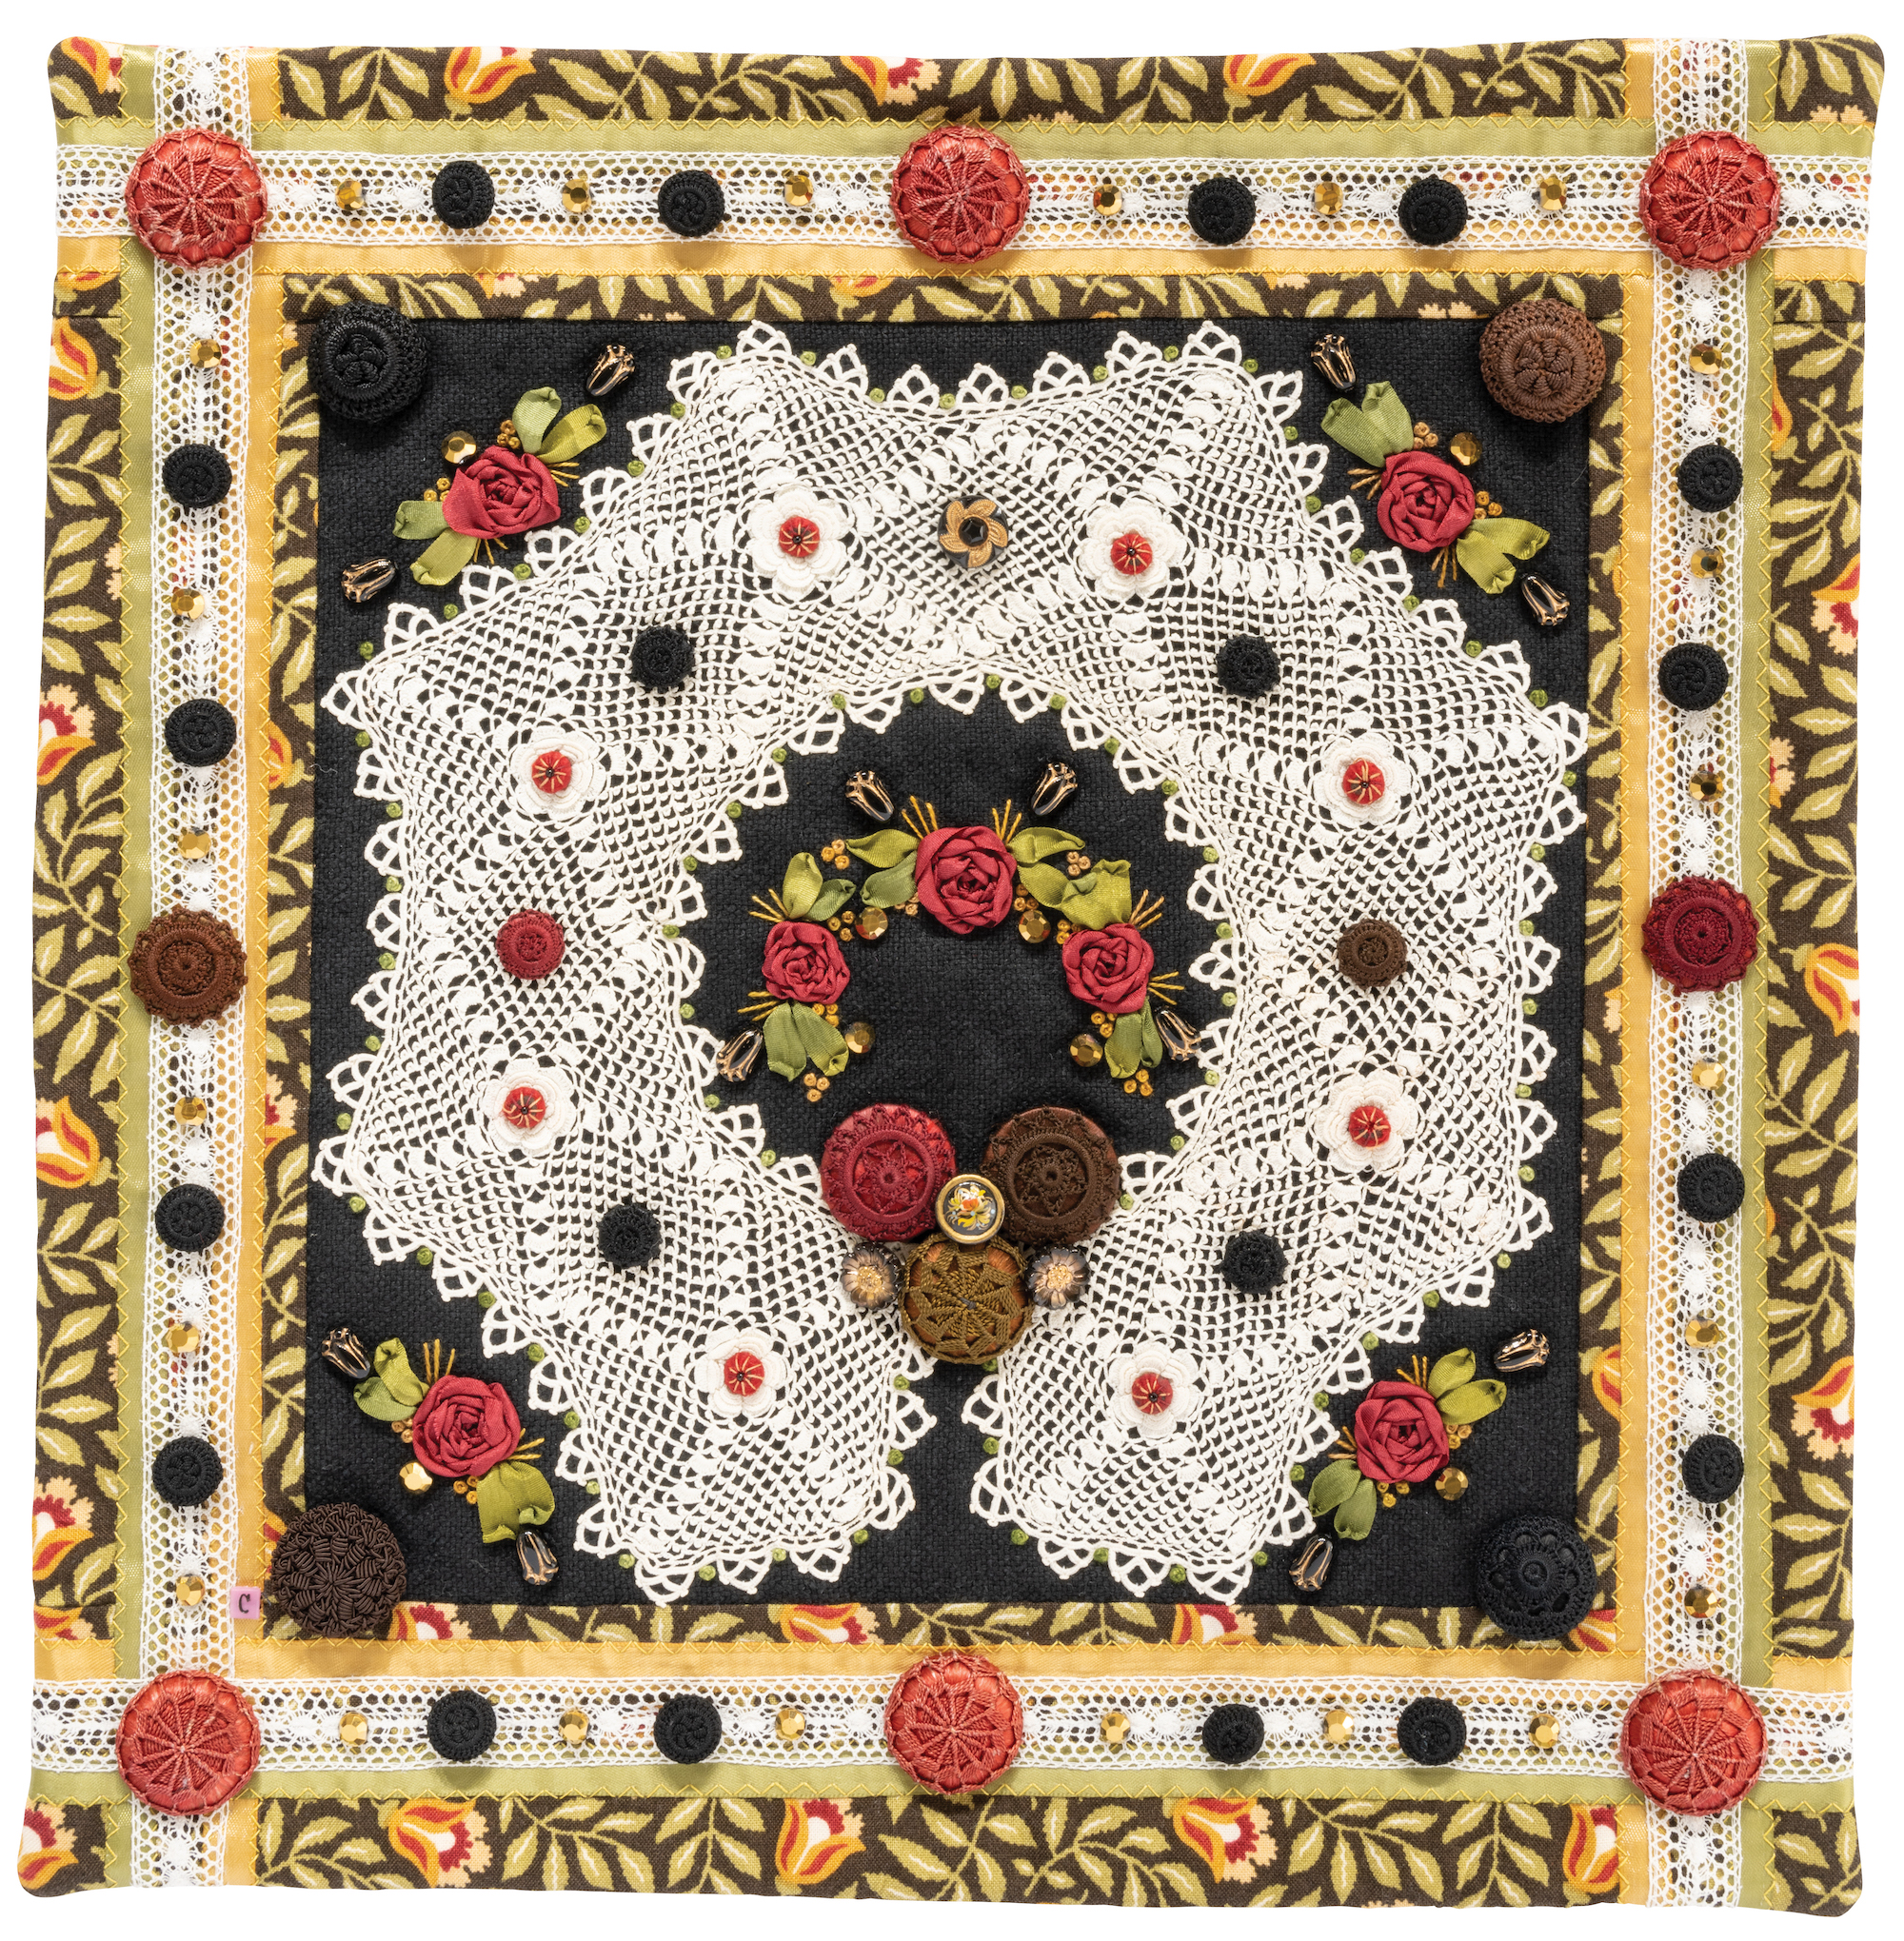
Rococo Pillow was a gallery example that I created for my book, Ribbonwork Gardens, by C&T Publishing. I used a variety of ribbons in the piece including: silk bias ribbon, woven ribbon, and vintage jacquard ribbon. I embroidered the flowers with silk ribbon embroidery stitches.
Blue Jean Baby was also a gallery example that I created for my book, Ribbonwork Gardens. I used a heart-shaped applique for the base, and filled it with ribbonwork rosettes, posies, and leaves. The tiny quilted kitty was a gift, and I think that she is quite happy here in her forever home.
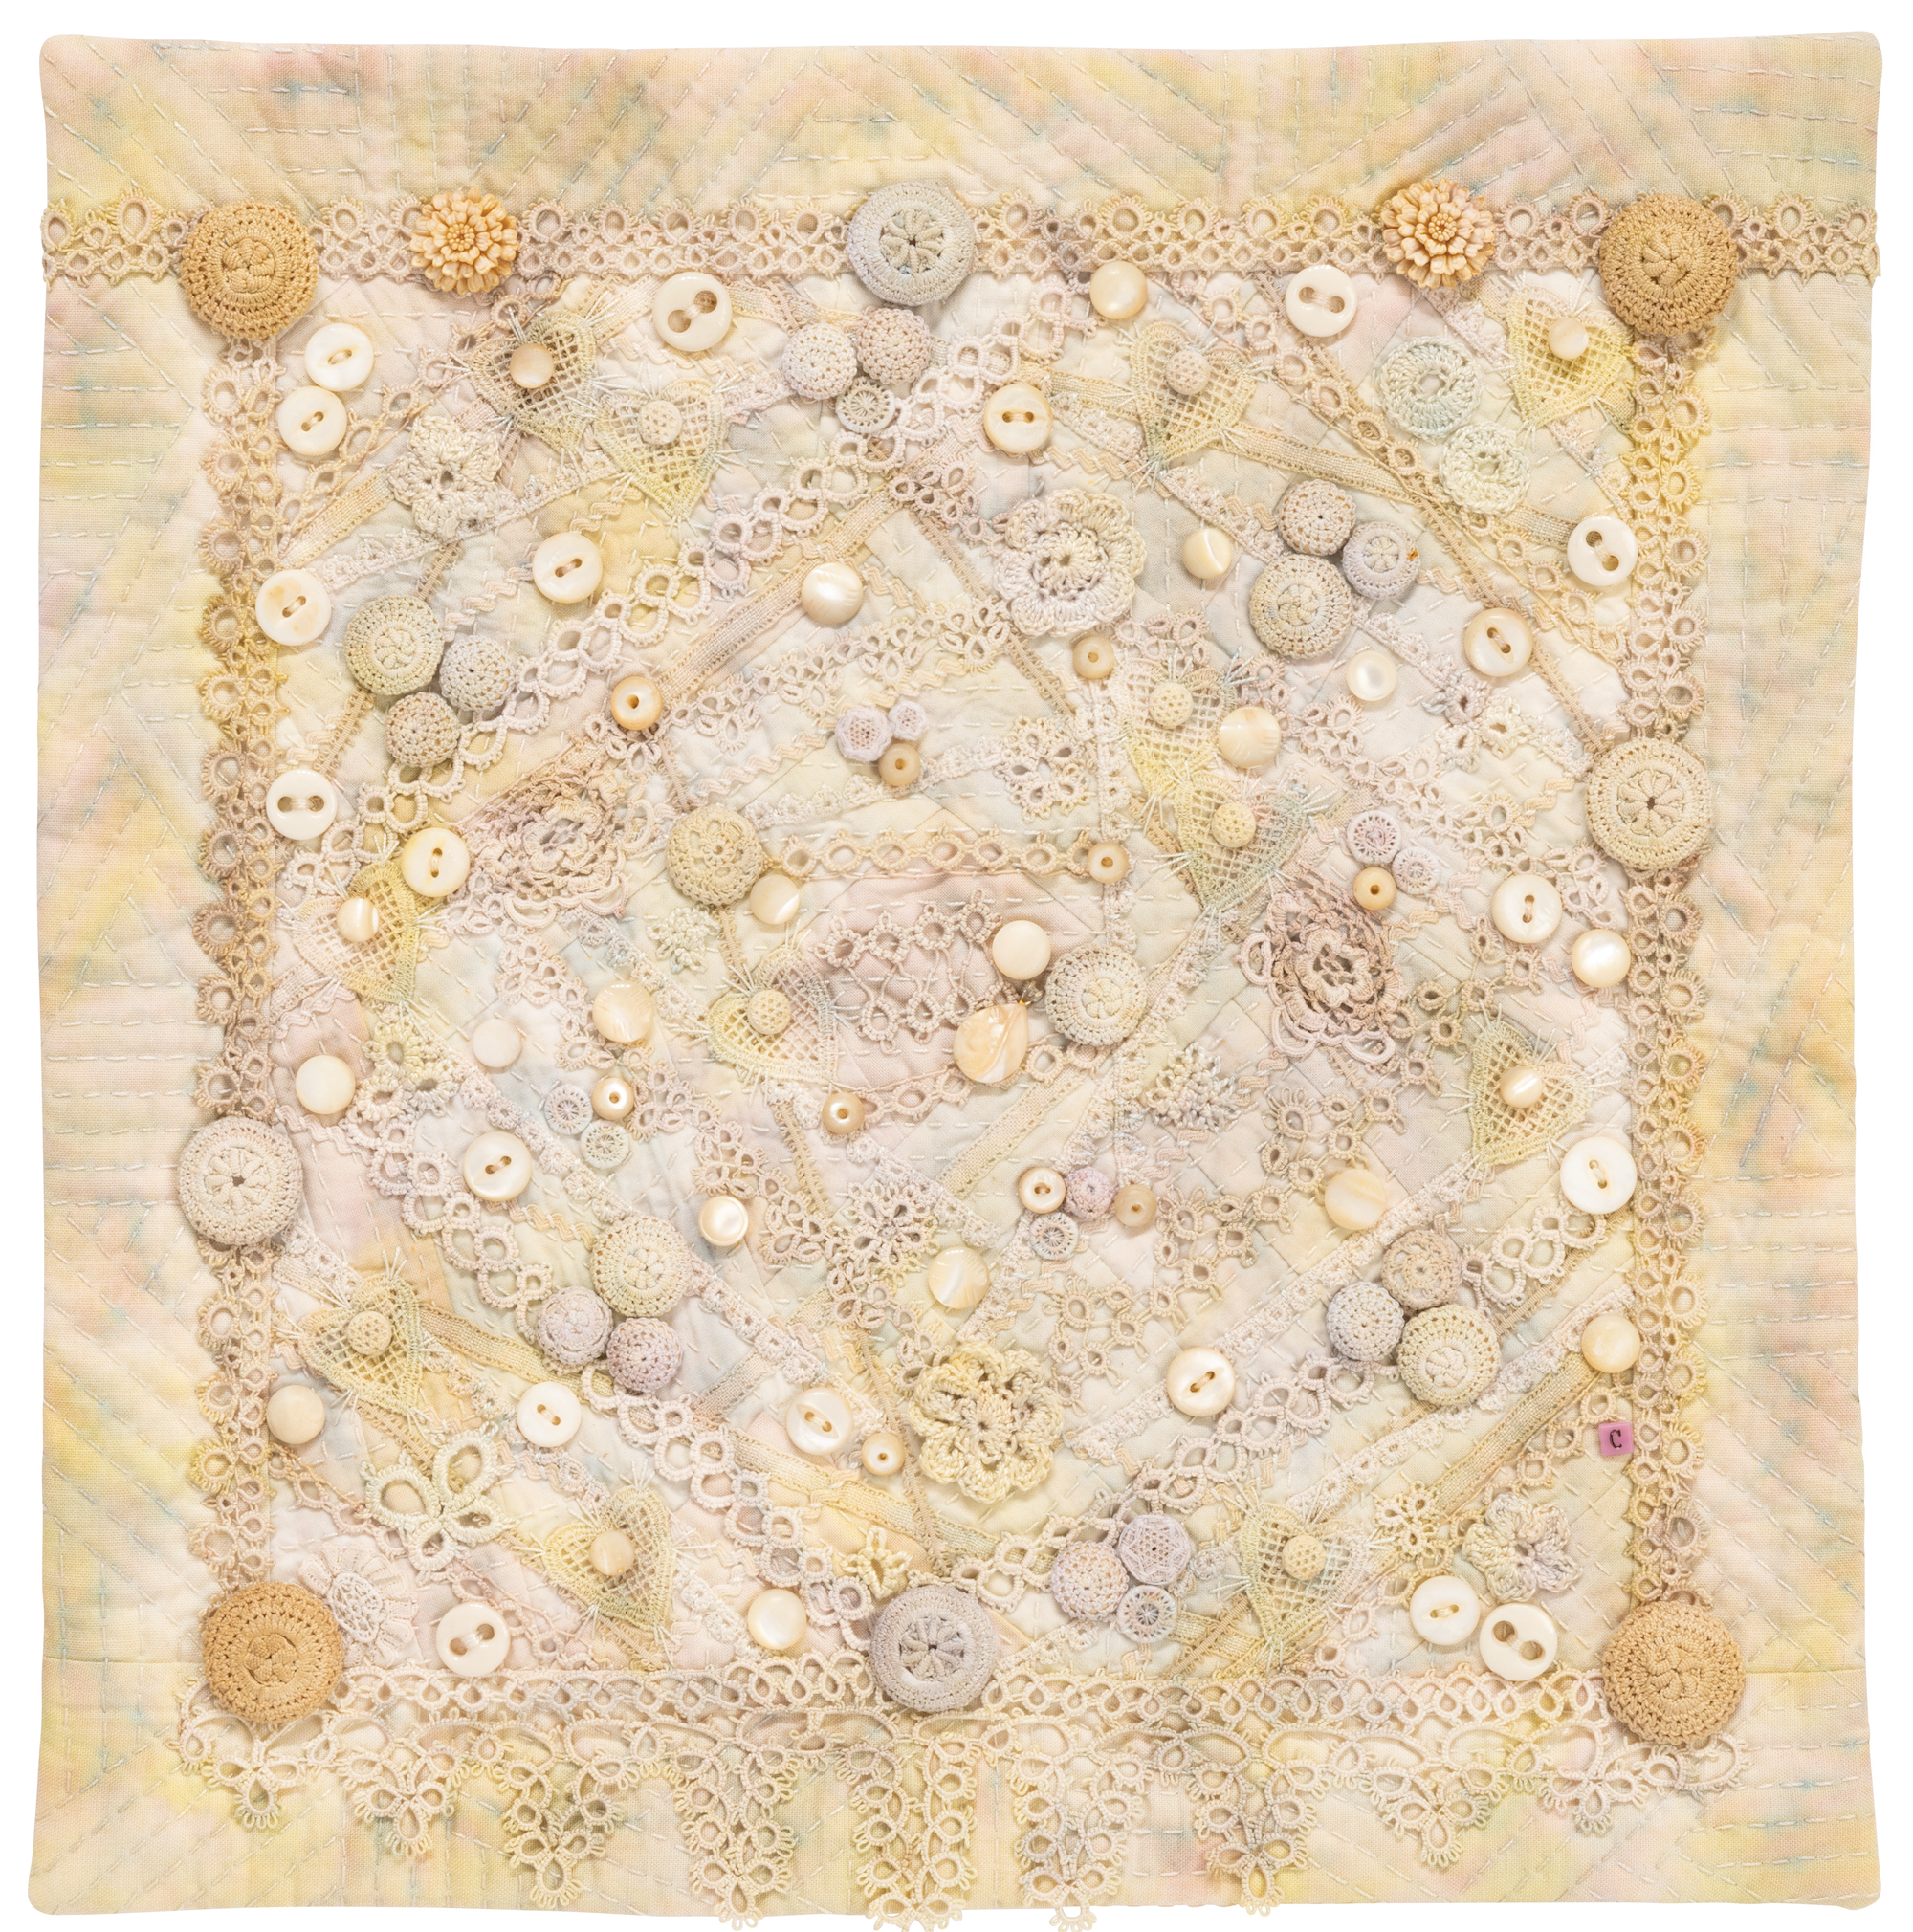
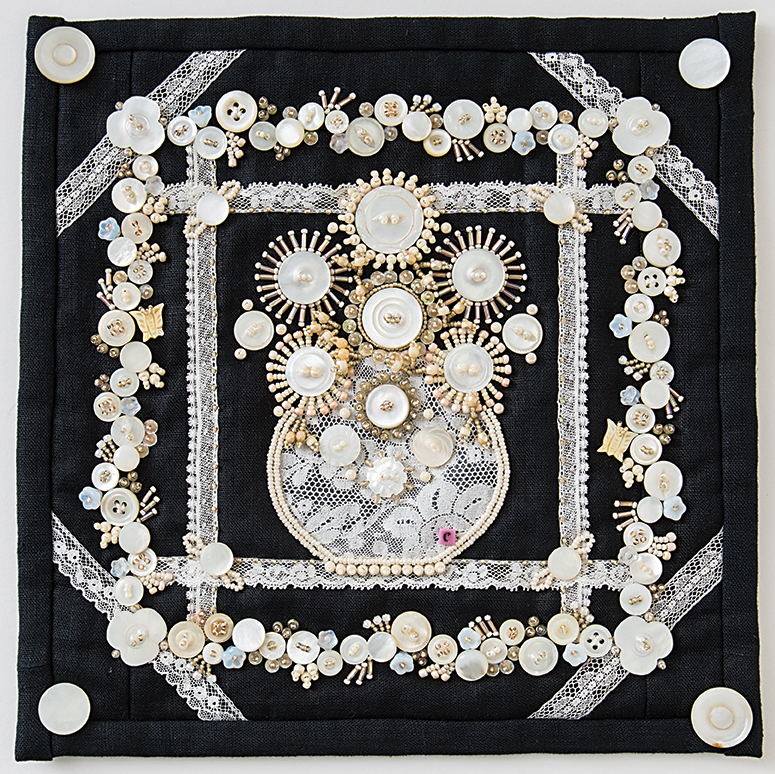
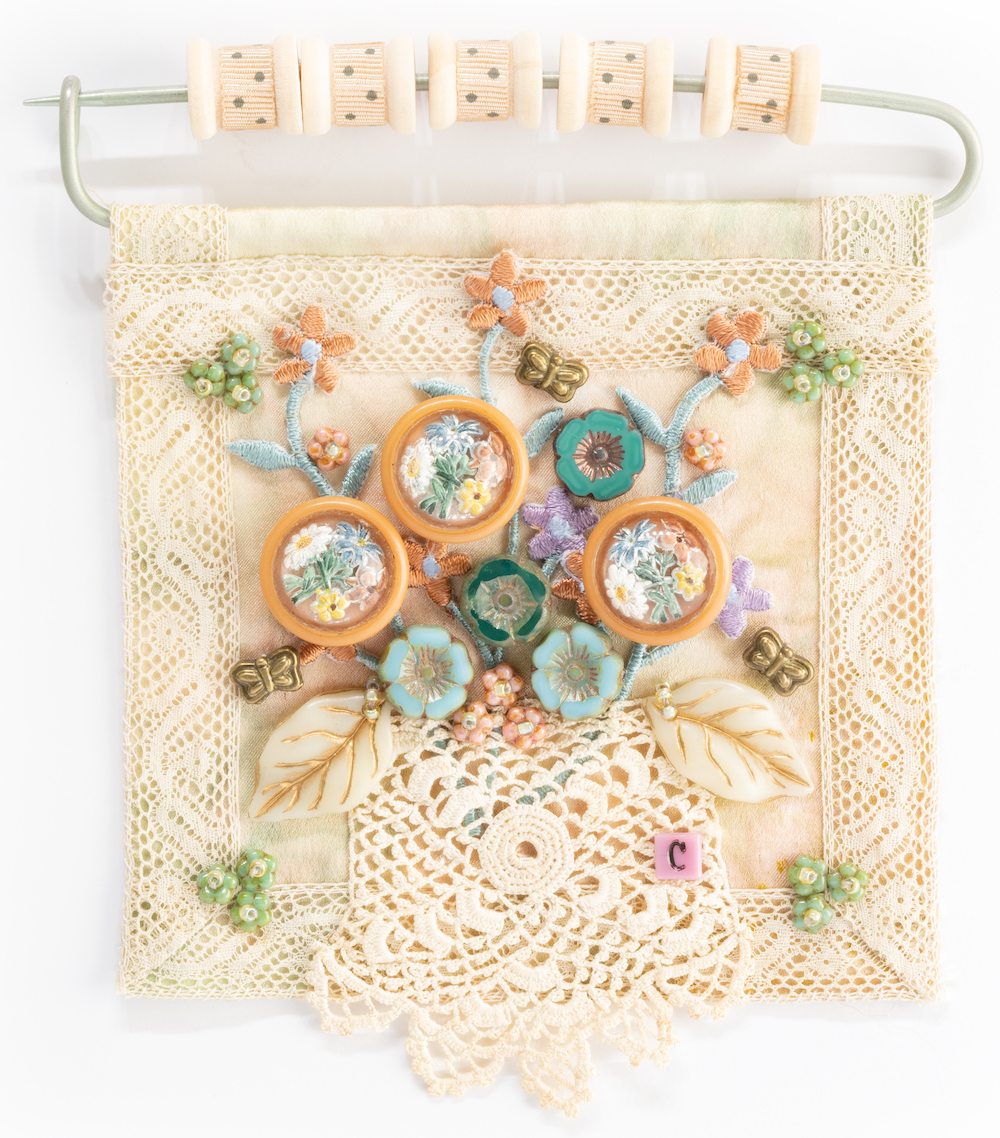
Lace, Doilies, and Appliqués, Block 1Lace, Doilies, and Appliqués, Block 2
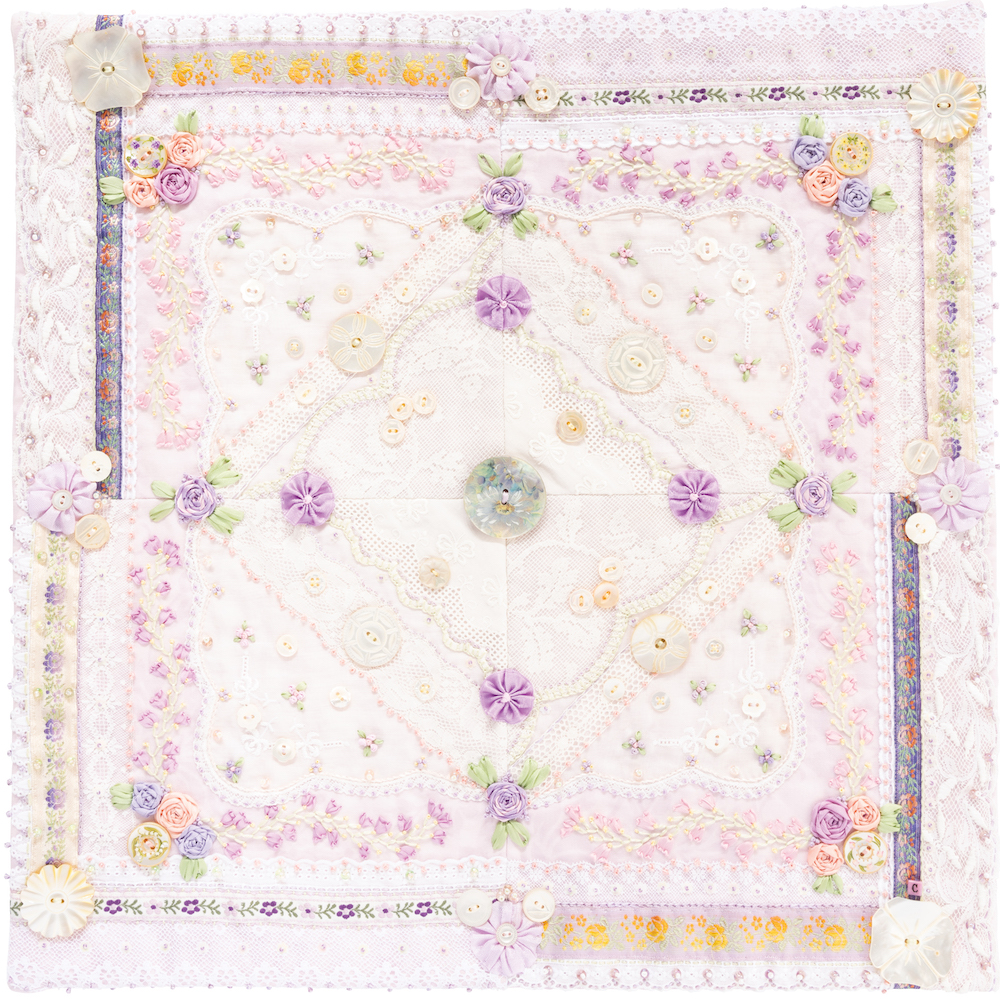
Lace, Doilies and Appliqués is one of the Projects by Design, from my new book, Creative Embroidery, Mixing the Old with the New. I combined ribbonwork flowers, with fabric yo-yo’s, buttons, charms and beads to create a floral display. The project has two block designs, which are repeated, and then stitched into a 4-block wallhanging.
Champagne and PearlsWelcome Home
Champagne and Pearls and Welcome Home are gallery pieces from my book Beaded Embroidery Stitching, by C&T Publishing. These pieces are variations of Feminine Fancies, Project A: Bouquet of Flowers. I used buttons for the base of the flowers, and embroidered the petals with beads, and beads, and well dare I say, more beads!
Tatiana’s GardenFlowers in a CuffSage and Cornflower
Tatiana’s Garden is a design example that I created for my book, The Embroidery Book, by C&T Publishing. I used two vintage cuffs and other pieces of flat lace to create the basket and the handle. I embroidered the piece with silk embroidery ribbon in sizes 4mm and 7mm, buttonhole twist, rayon twist, perle cotton #12, seed beads in a variety of sizes, glass charms, and buttons.
Flowers in a Cuff is a Stash Idea Inspiration piece, from my new book, Creative Embroidery, Mixing the Old with the New. I died a vintage lace cuff and grosgrain ribbon with Colorhue Dyes. I filled the basket with rosettes made from the grosgrain ribbon, cloth and mother-of-pearl buttons, and a few glass charms. I embroidered the piece with a variegated #8 perle cotton thread.
Sage and Cornflower is a new gallery piece that I created, based on the Projects by Design: Lace, Doilies and Appliqués, (see first row of images above). The base started as half of a stained doily, which I dyed with Colorhue dyes, as well as the lace and rickrack trims. I used Finca Mouline perle cotton, Valdani variegated perle cotton, and dyed perle cotton by Artfabriks. I embellished the piece with seed and larger glass beads; vintage glass and celluloid buttons; and brass charms.
What more can I say? I have a selection of pieces to show you today, from my upcoming book, Creative Embroidery, Mixing the Old With the New, by C&T Publishing. Some of the pieces are gallery examples, some are examples of the projects included in the book.
Vintage hand- or machine- made laces can be used as a focal point, or for embellishments.
Framed Lace Collar: is a Stash Project that displays a beautiful vintage lace collar. You could substitute a nightcap, handbag, or vintage pair of gloves. I embroidered vignettes of silk embroidered roses and leaves, and added vintage buttons and glass beads for the embellishments.
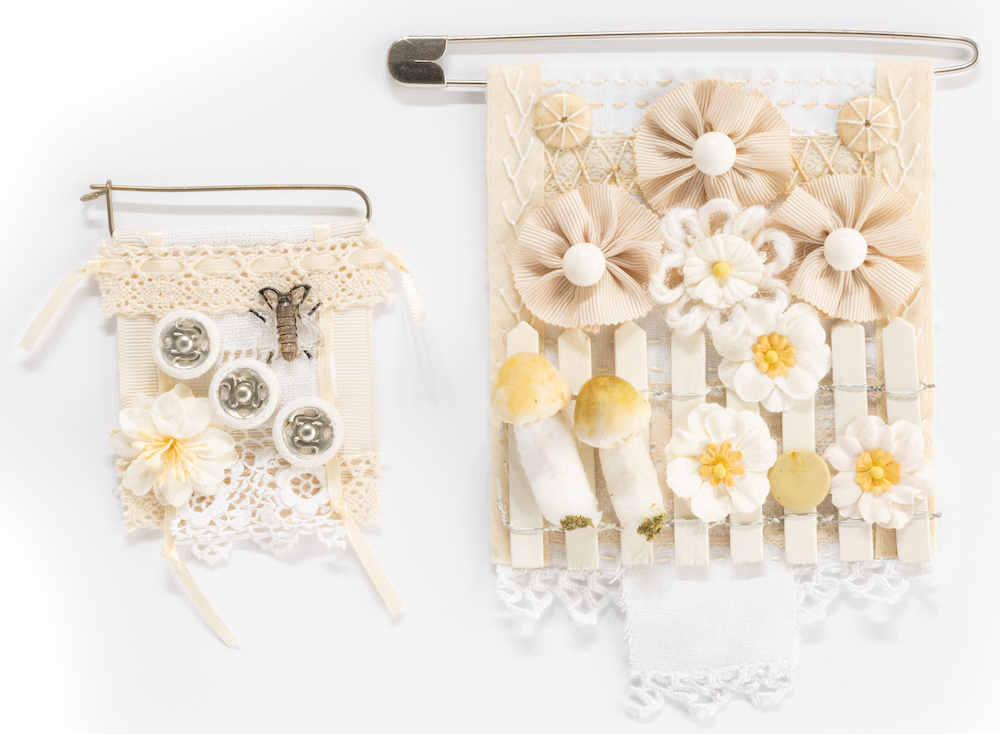
Scrap PinsLace Collage Brooch or Needle Keep
Scrap Pins and Lace Collage Brooch or Needle Keep: These are two of the Stash Projects, that use very little materials, and time to make. They are a perfect way to preserve and use up small bits of this and that, and to give them purpose again.
My Fair LadyLace and Rose Finery
My Fair Lady (gallery piece): I took a reproduction silk print, and framed it with a printed cotton upholstery fabric. I decorated the base of the frame with vintage and new ribbons, laces, and trims. I added in floral bridal appliqués, vintage glass buttons and beads, vintage shell buttons and buckles. I embroidered silk roses at her neckline, and added buttons down the front of her blouse and on her bonnet. If you would like to make a similar frame, I have written a free handout for C&T Publishing.
Lace and Rose Finery (gallery piece): The base of this piece started with a vintage upholstery linen. I collage-pieced my precious stash of beautiful, fine, lovely bits of lace given to me by my sister-in-laws mother’s husband, a collection that belonged to his mother Evonne. I added in sections of crochet lace for the baskets, and filled these with silk ribbon embroidered flowers and leaves. The embellishments include vintage glass and metal buttons, glass beads and charms.
What more can I say? I have a selection of pieces to show you today, from my upcoming book, Creative Embroidery, Mixing the Old With the New, by C&T Publishing. Some of the pieces are gallery examples, some are examples of the projects included in the book. All with wonderful buttons!
Vintage linens like napkins, hand towels, embroidered cotton doilies with lace edges, can be combined with lace doilies and trims to create a collage base that can also include fabrics, ribbons, and trims.
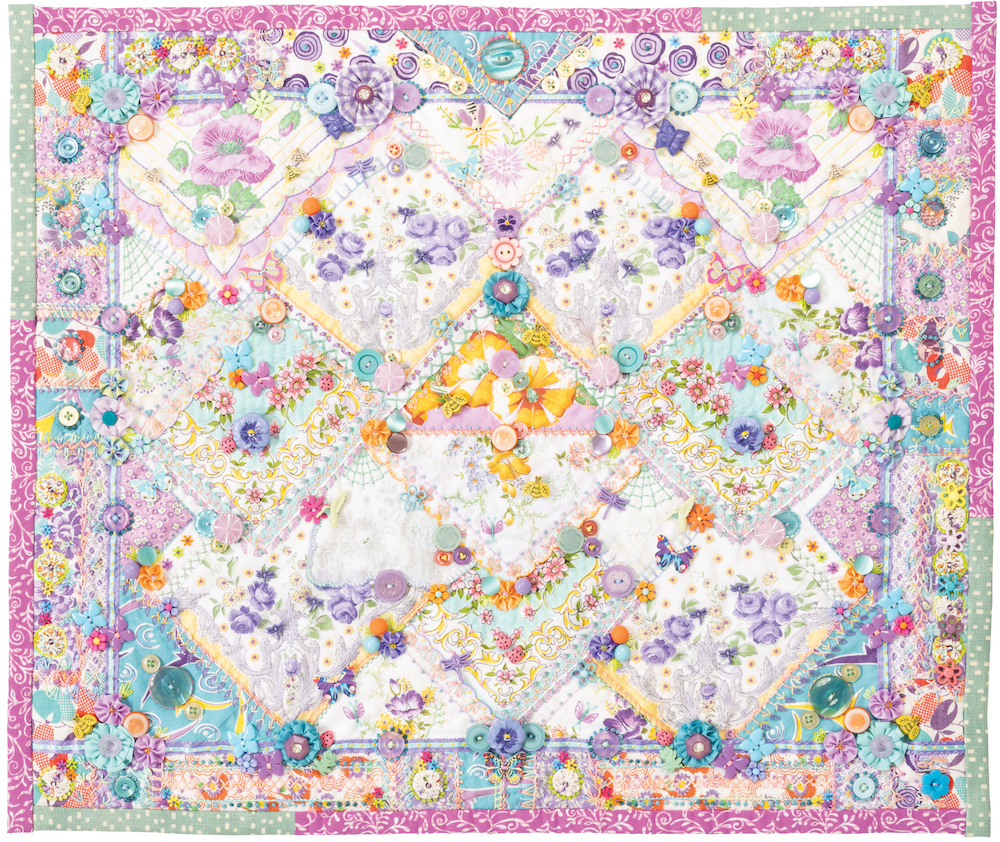
Faded Shades of Rococo Days: This is a Stash Idea Inspiration piece. I pieced a base of a charm packet of Moda prints, and additional printed cotton fabrics. I stitched with a nine patch square for the center, framed this with a strip of a printed cotton fabric, then finished off with a pieced boarder of the remaining charm squares. I placed a lace doily in the center section, and layered cotton flat lace throughout the base. I highlighted the center section with a velvet ribbon. I embroidered and embellished the base with threads, beads, buttons, and ribbonwork flowers and leaves.
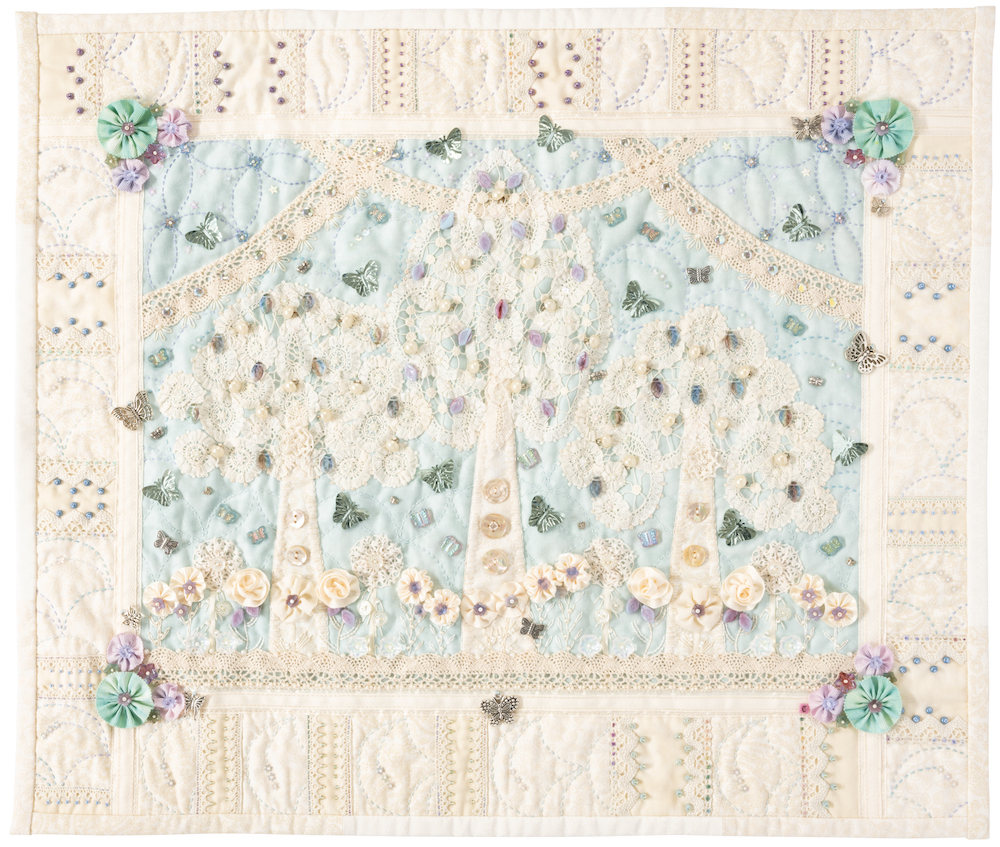
Butterfly Fields: This is a Stash Idea Inspiration piece. An old Battenburg lace doily was cut into sections to form the three trees that are stitched to a batik background framed with a strip-pieced border. Embellishments include ribbonwork and lace flowers, beads, sequins, buttons, and charms.
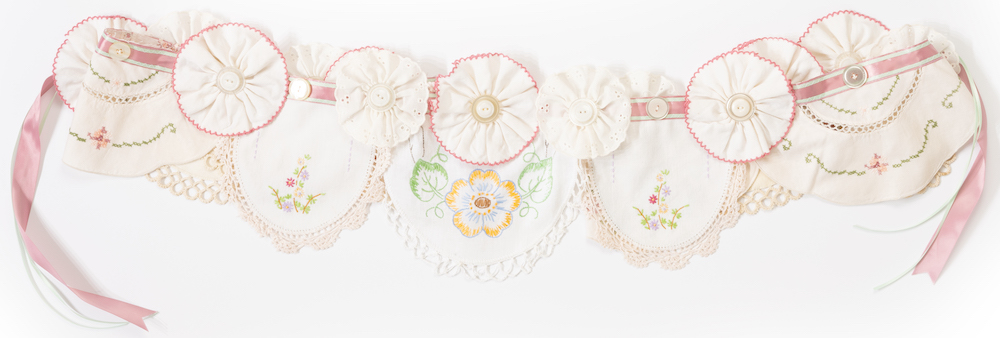
Doily Bunting: This is a Stash Project, that is a great way to use up your collection of embroidery and printed doilies.
Girly Girls: This is a Stash Idea Inspiration piece. This entire collection of doilies, napkins, and small serving placemats was given to me by friends and family members. The kid glove belonged to my grandmother, and my mother stitched the oval floral pieces. The earrings came from my husband’s grandmothers and the jacquard ribbon from his mother. The vintage buttons, jewelry, perfume vials, and glass beads were purchased at thrift stores and online.
Here is a video that I shot at the C&T Publishing Studios, that focuses on the new book, and some of my favorite pieces.
What more can I say? I have a selection of pieces to show you today, from my upcoming book, Creative Embroidery, Mixing the Old With the New, by C&T Publishing. Some of the pieces are gallery examples, some are examples of the projects included in the book.
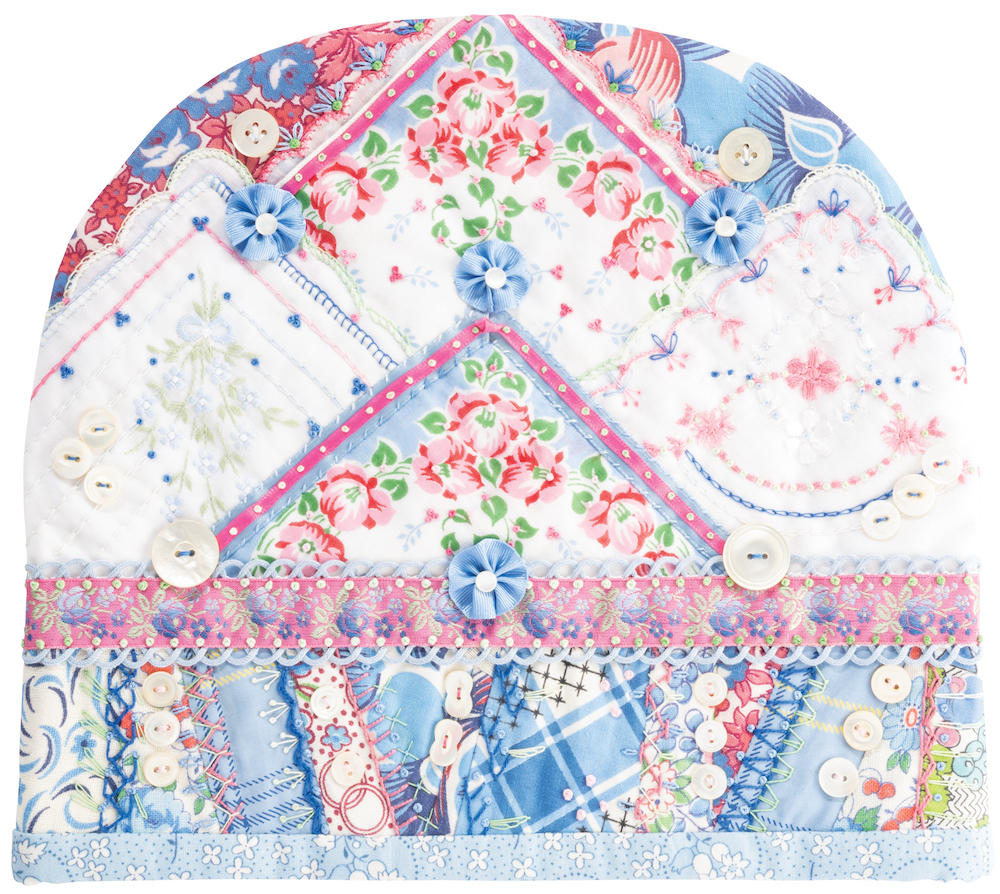
Vintage hankies can be layered to create a collage base or can be combined with other fabrics. These are often made from cotton, cotton batiste, linen, and silk fabrics.
Bella Fleur Mouchoir (Beautiful Flower Handkerchief): The base of this wallhanging is made from vintage hankies that had belonged to my mother. I combined the hankies with scraps of vintage feed sack and new cotton fabrics, and satin ribbons. I embroidered stitches around the edges of the hankies and ribbons and the seams of the pieced fabric. I made ribbonwork flowers using vintage cotton bias tape and woven ribbons. This piece is adorned with vintage and new plastic buttons.
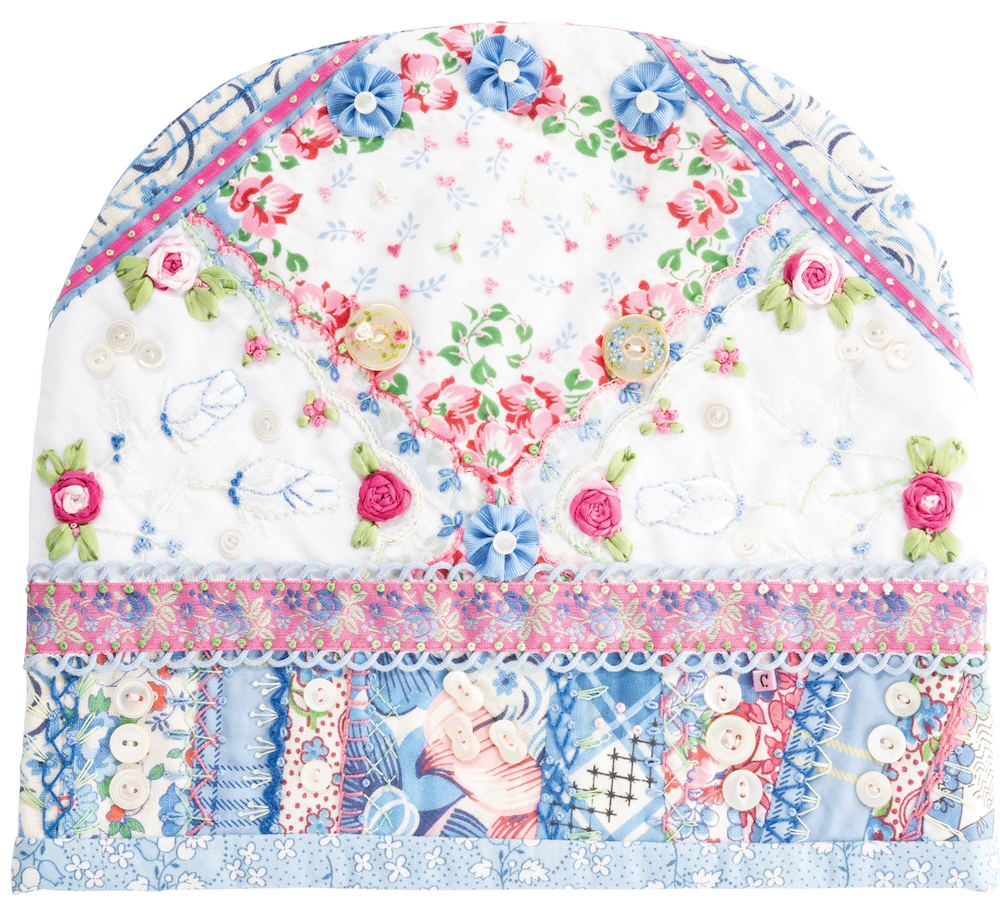
Tea Cozy frontTea Cozy back
Tea Cozy: This is a Stash Project that uses hankies, ribbons, and bits of fabric. Three embroidered hankies and one printed hanky were combined with vintage feed sack fabrics to create the front and back of the base. Vintage jacquard and satin ribbons were used to cover raw edges and to make ribbonwork rosettes. The embroidery is worked in perle cotton, cotton floss, and silk embroidery ribbons. Vintage mother of perle buttons are sprinkled throughout the front and back of the cozy.
Hanky and Lace Collage: This is a Project by Design, and starts with a printed fabric, a hanky, and varying widths of vintage lace and jacquard ribbons. The collage design is embroidered with silk embroidery ribbon, silk, and rayon floss. Embellishments include rosettes, buttons, sequins, and beads.
For Elizabeth: This is a Stash Idea Inspiration piece, that started with a white cotton batiste handkerchief embroidered with the letter “E“, pieced with two colors of moire fabric. I dyed vintage lace and appliques with Colorhue dyes. I made ribbonwork flowers from vintage velvet and hombre woven ribbons. I worked silk ribbon embroidery stitches around the flowers and appliqués.
Hankies and Rosettes: This is a Stash Idea Inspiration piece, that stared with two cotton hankies, one with a crochet trim. I cut the hankies into quarters, and layered them on a vintage knitting pin. I covered the pin with an hombre ribbon, so that it would match the colors of the crochet trim, embroidery stitches, and the ribbon rosette flowers.
Here is a video that I shot at the C&T Publishing Studios, that focuses on the new book, and some of my favorite pieces.
What more can I say? I have a selection of pieces to show you today, from my upcoming book, Creative Embroidery, Mixing the Old With the New, by C&T Publishing. Some of the pieces are gallery examples, some are examples of the projects included in the book.
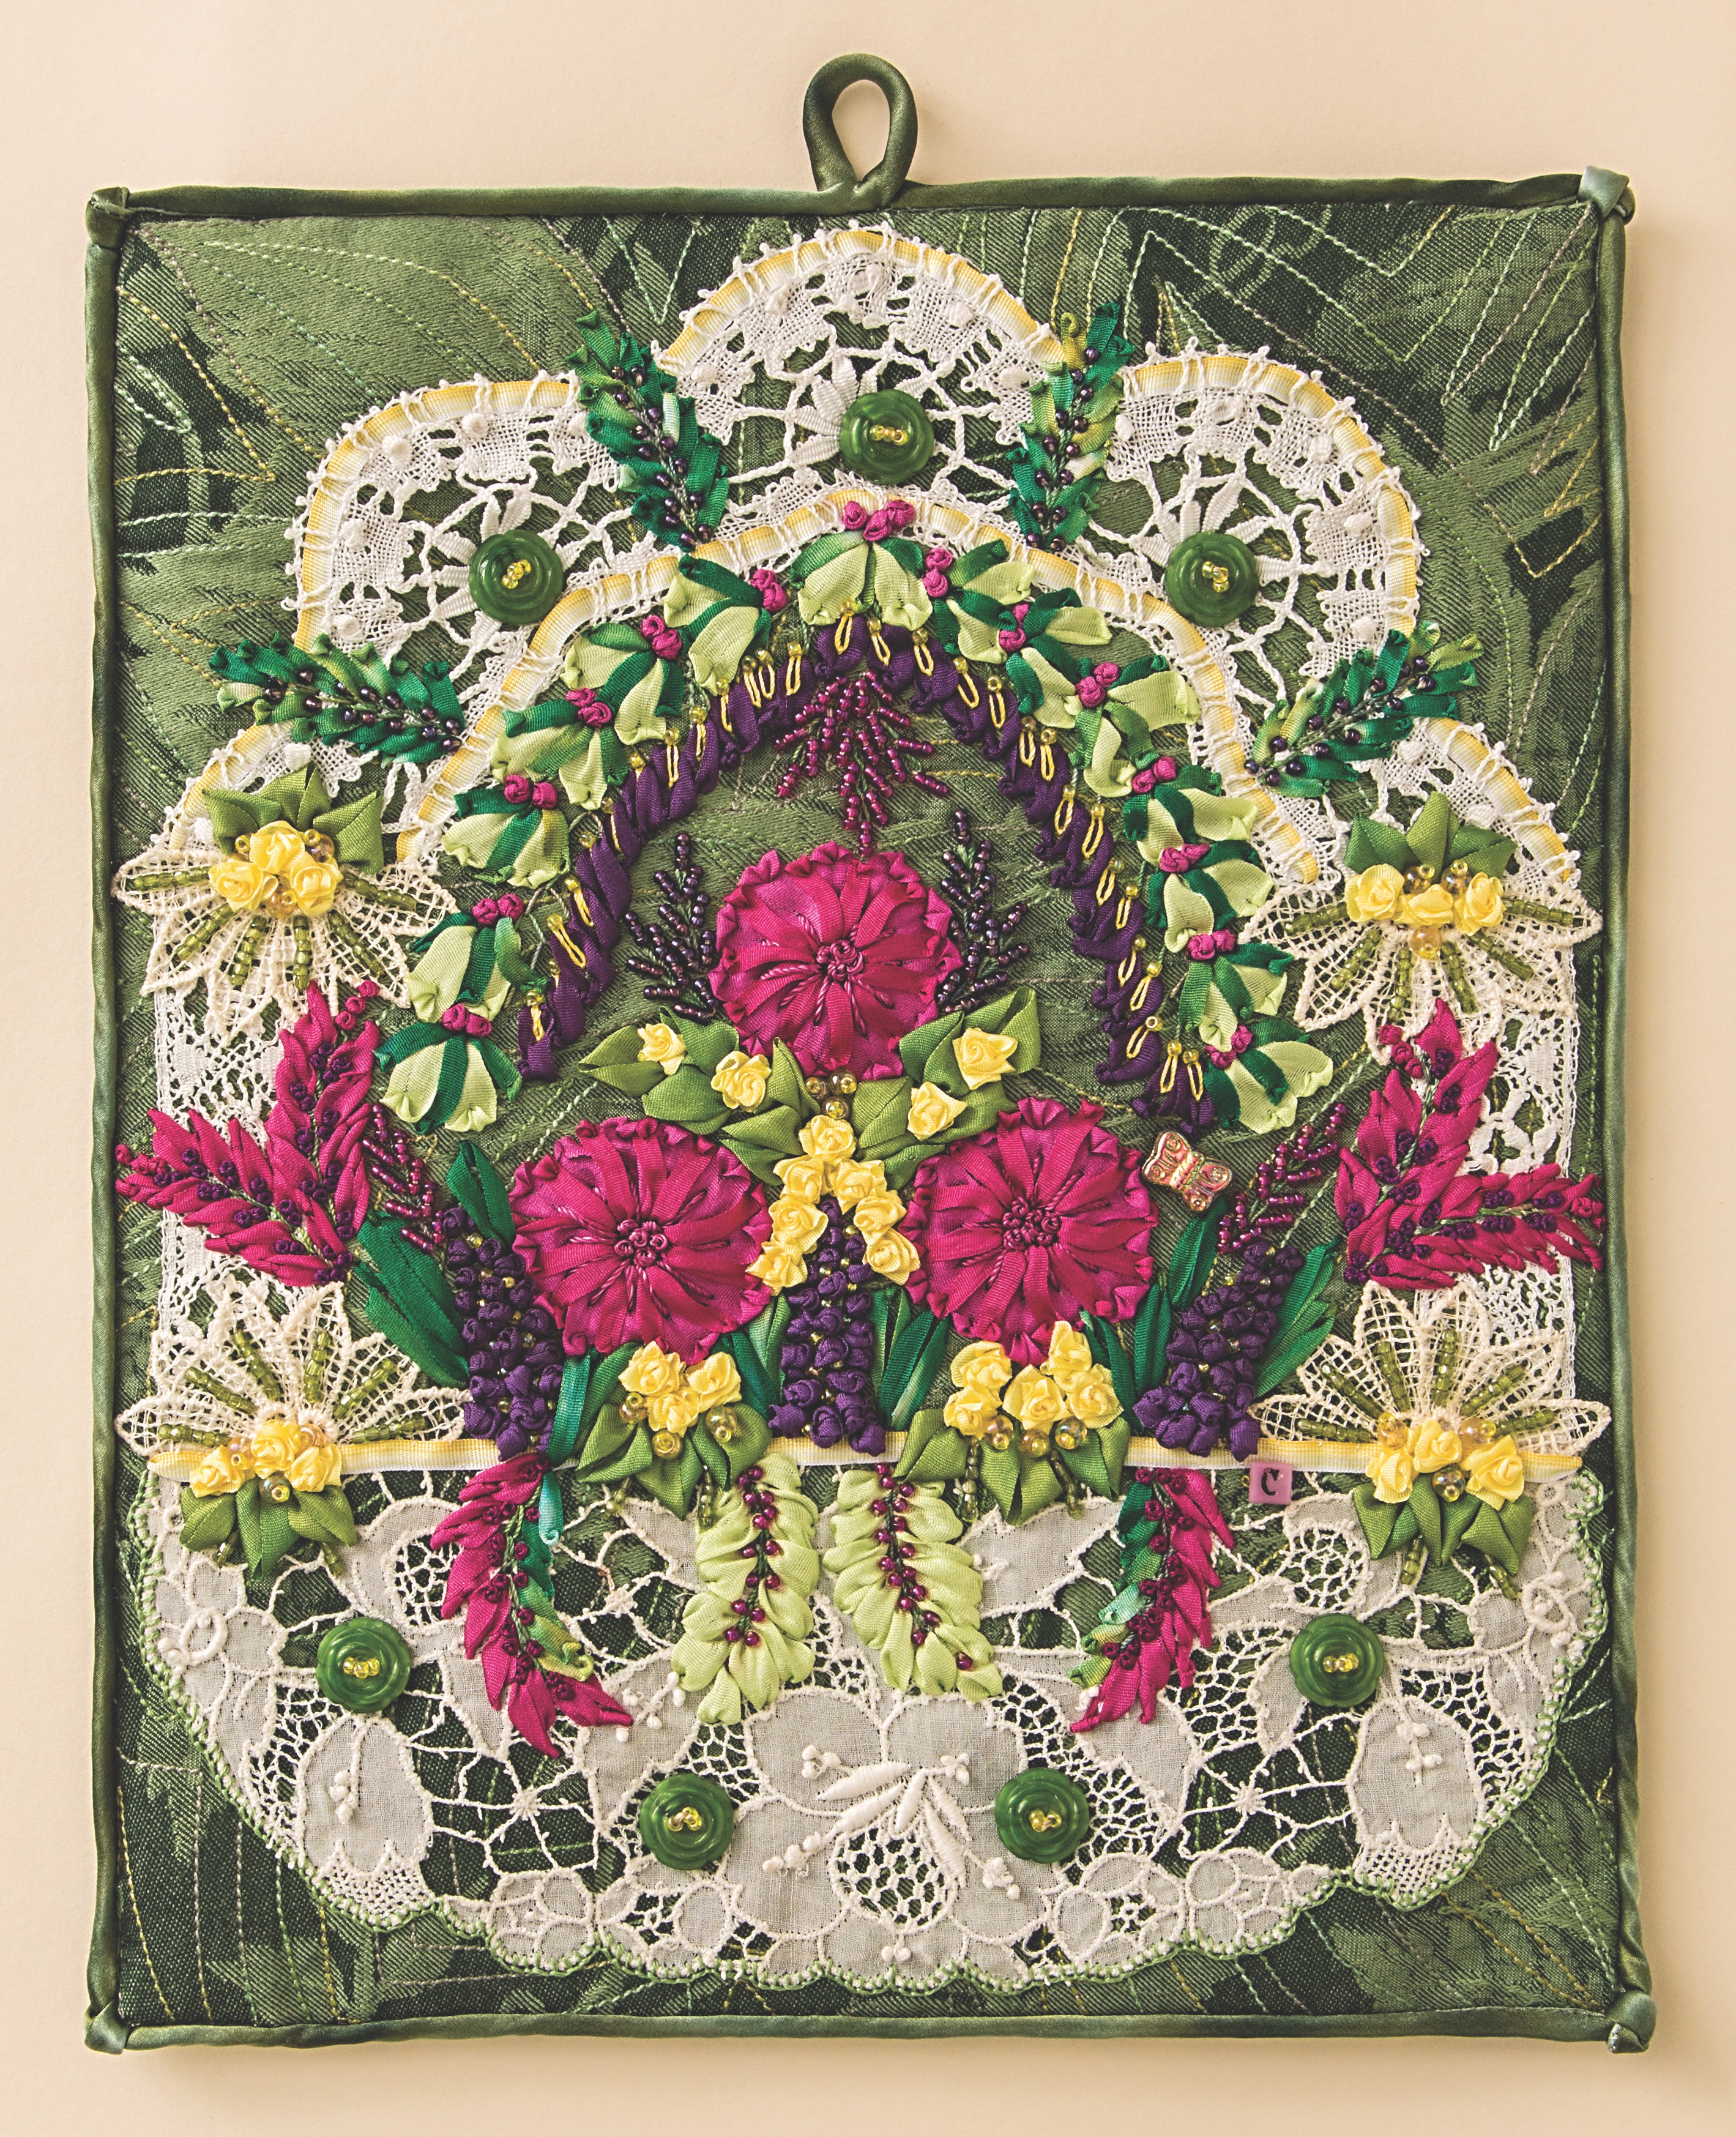
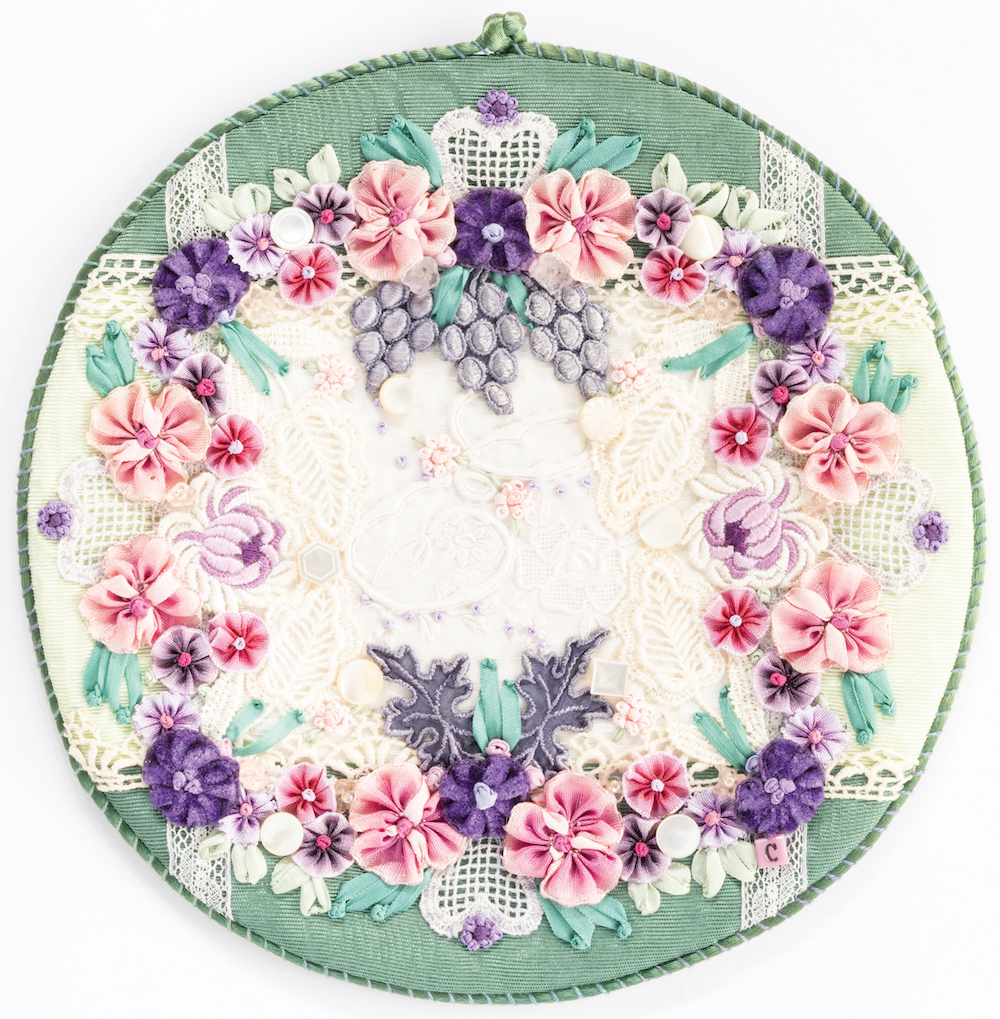
Doilies, appliqués, and wide flat lace can be used as a starting point to make a pretty basket that you can then fill with ribbonwork flowers, buttons, embroidery, charms, and beads.
Notions of Spring: A Stash Idea Inspiration piece. I cut a large doily in half, and used one half for the base. I cut a smaller doily into four sections, which created the heart shaped pieces in each corner. I filled the vase with the flowers and leaves included in the chapter Altering the Past. I even used and old tool that belonged to my mom, called the “Daisy Maker” which was used to make a flower from yarn. I substituted a lace hem tape for the yarn, and it worked out perfectly! I embellished the piece with several sizes of rickrack, a vine trim, a coronation cord, sewing notions, buttons, charms, and bells.
Lace, Doilies and Appliqués: Is one of the Projects by Design. I combined ribbonwork flowers, with fabric yo-yo’s, buttons, charms and beads to create a floral display. The project has two block designs, which are repeated, and then stitched into a 4-block wallhanging.
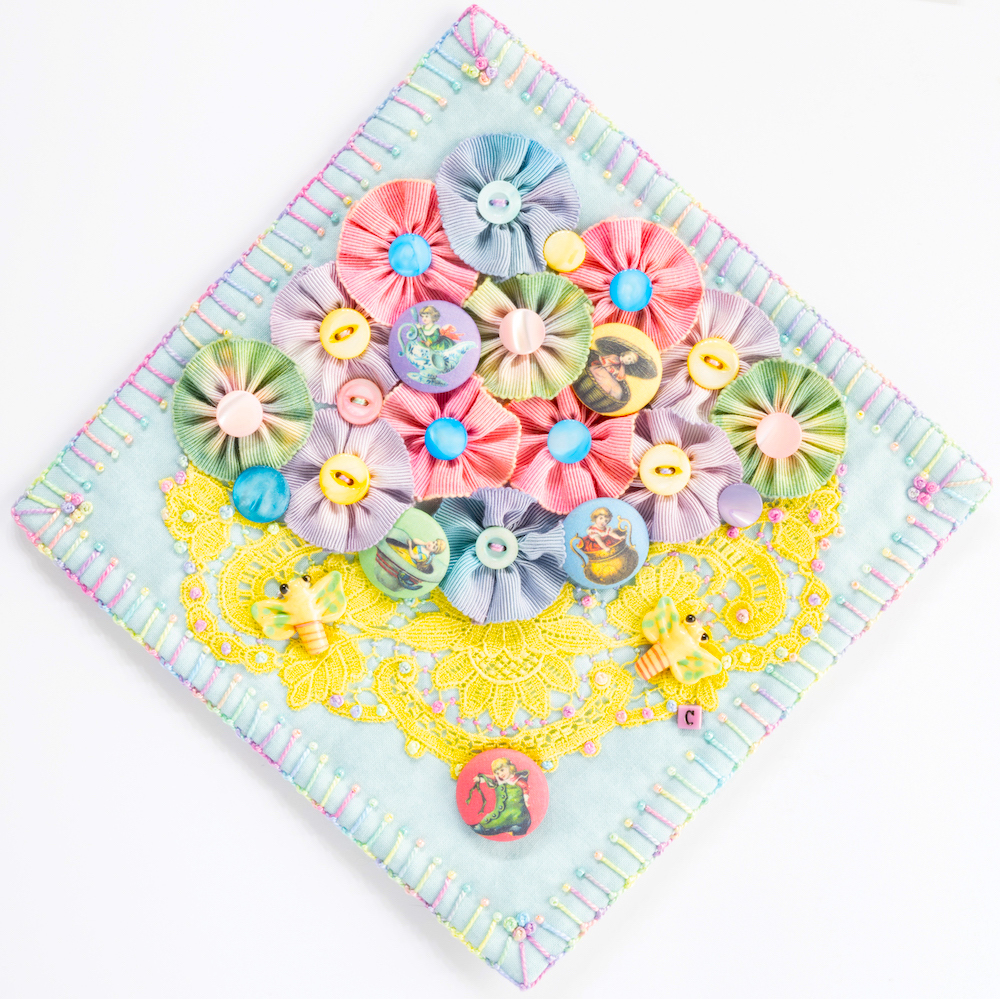
Flowers in a CuffAunt Murt’s Garden
Flowers in a Cuff: Is a Stash Idea Inspiration piece. I hand-dyed the cuff, and the grosgrain ribbons that I used to stitch the ribbonwork rosettes. I had been saving those fun character buttons for years, waiting for just the right project to come along. I also used vintage dyed mother-of-perle buttons for the centers of the flowers.
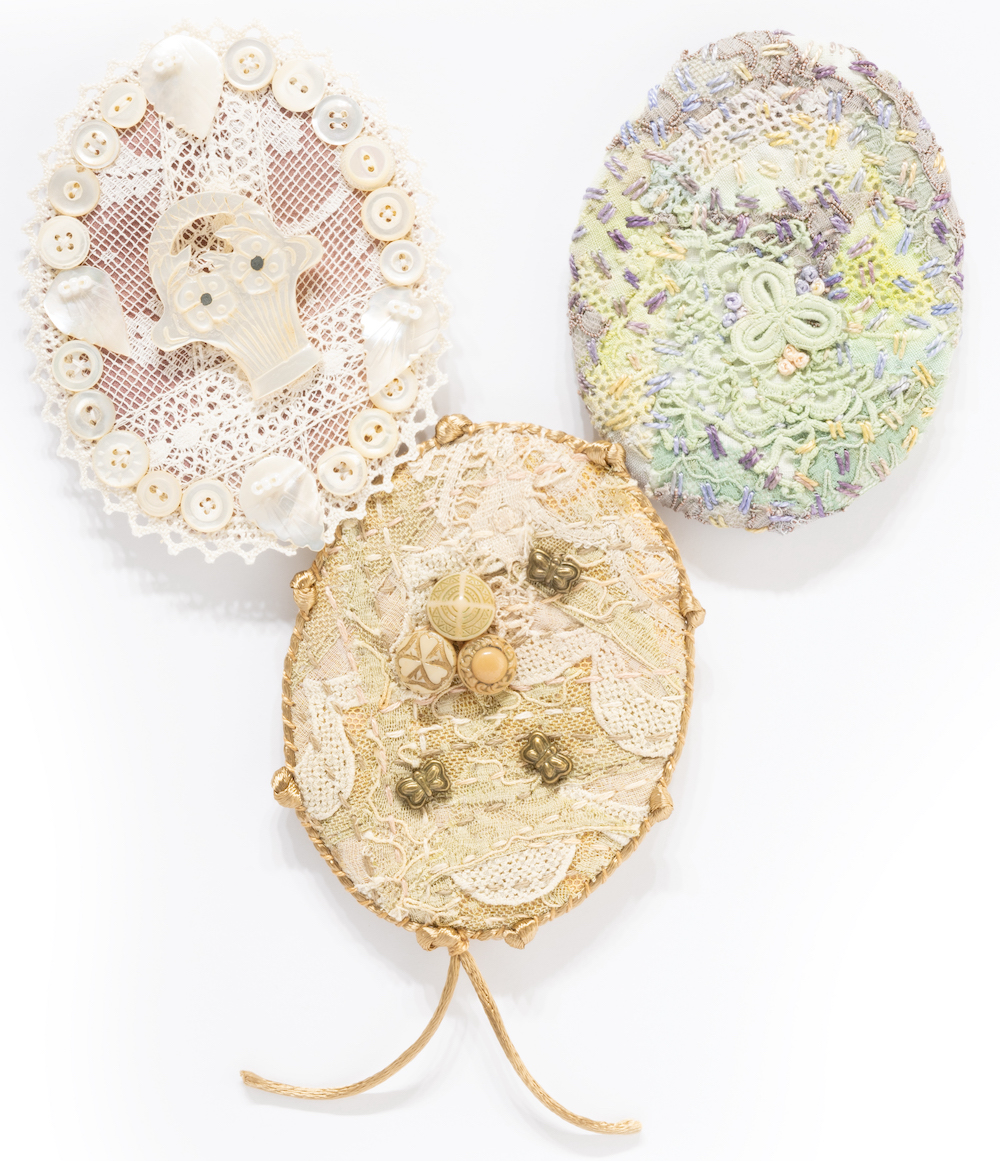
Aunt Murt’s Garden: Is an example of the Stash Project called Scrap Pins. I used a section of vintage crochet lace for the basket, and stitched it onto a dyed silk base, finished with vintage flat lace. I stitched machine-made appliqués, vintage buttons, plastic leaves, glass roundels, and glass beads into and around the basket. I used a vintage knitting pin for the hanger.
Hoop Frame: This is a Stash Project. The base is a piece of decorator fabric set into a vintage hoop frame, which is adorned with a beautiful lace doily, and another piece of vintage crochet lace. I embroidered stems with the feather and couched stitch, leaves with the lazy daisy stitch, and French knot stitch details. The flowers are vintage mother-of-pearl and muscle shell buttons, with ladybug and dragonfly charms sprinkled throughout the bouquet.
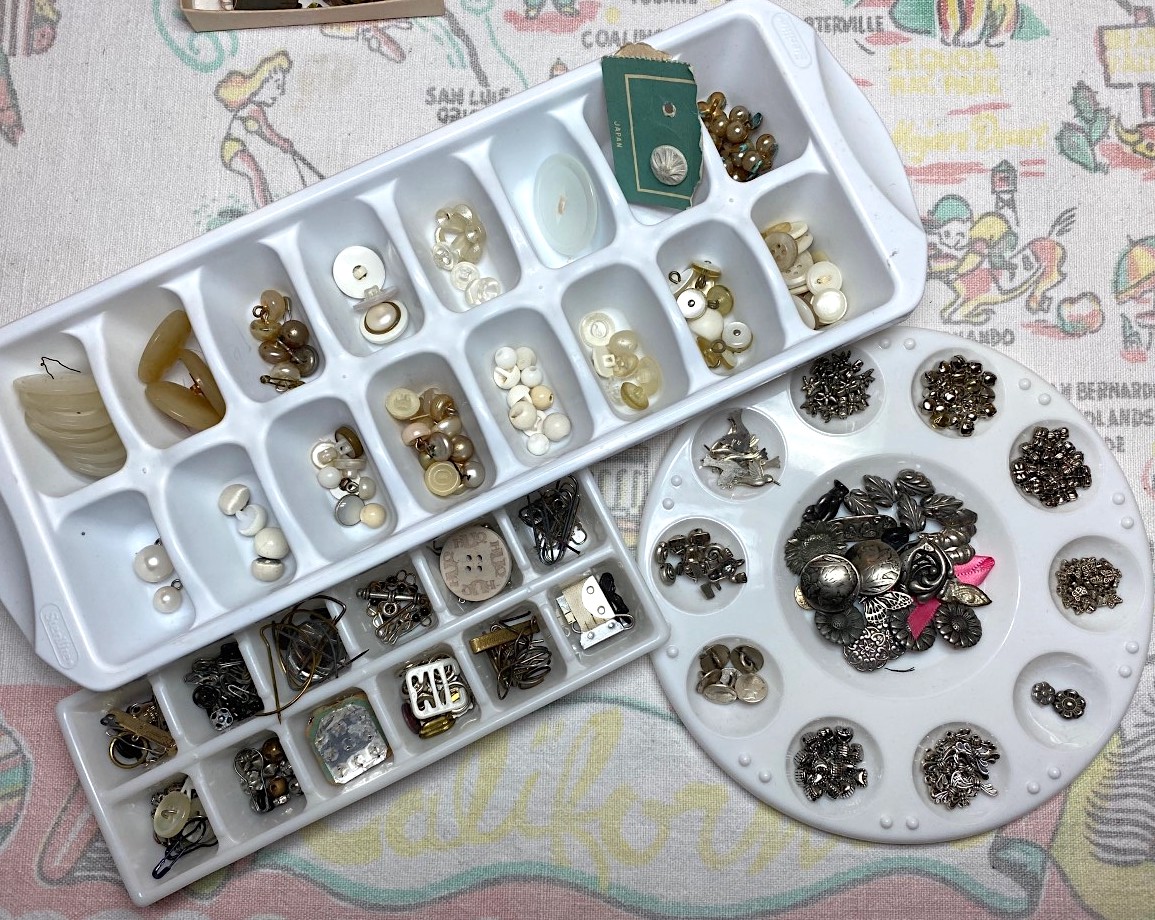
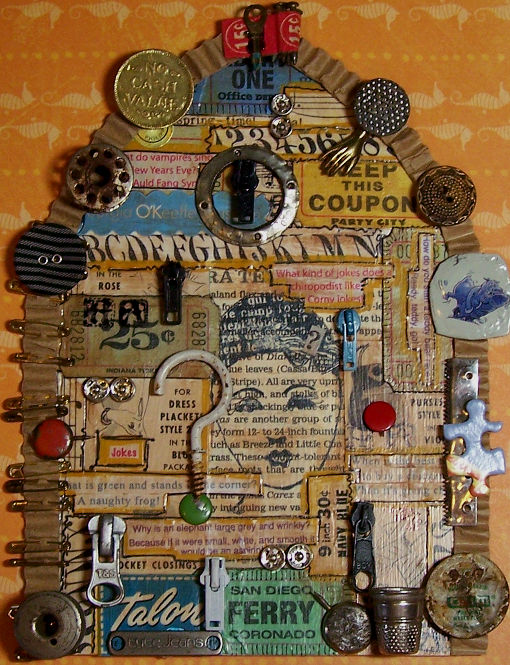
Well in this case, well organized boxes of junk, collected ephemera: some new, some found in the street, some found in the craft section of my favorite haunts.
And more boxes and containers of the stuff I just can’t seem to discard, and thankfully no one has asked me to yet either!
Junk-Man 1Junk-Man 2Junk-Man 3
Junk-Man Series: All manner of collected ephemera, cast away junk, and fun stuff.
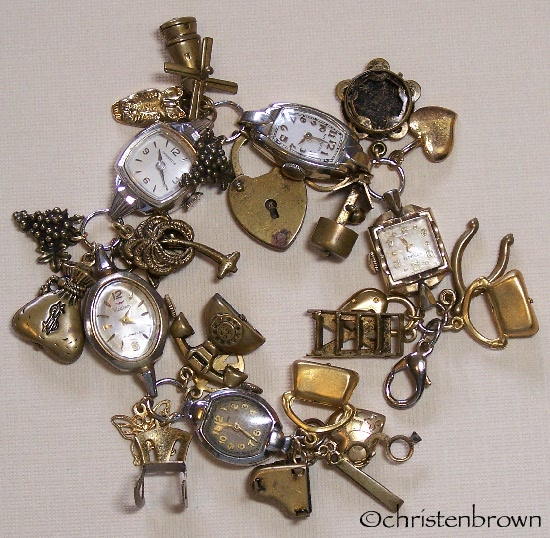
Junk Jewels: Gathered and collected bits, odd singles, old earrings, watches, zipper pulls, and other treasures.
Junk full of GigglesJunky Funky FlowersSteampunk Junk
Junked-Up Mixed Media: Assorted small wall decorations, made from paper, glue, and found treasures.
Happy Stitching, or in this case, searching, gathering, and gluing! ~Christen
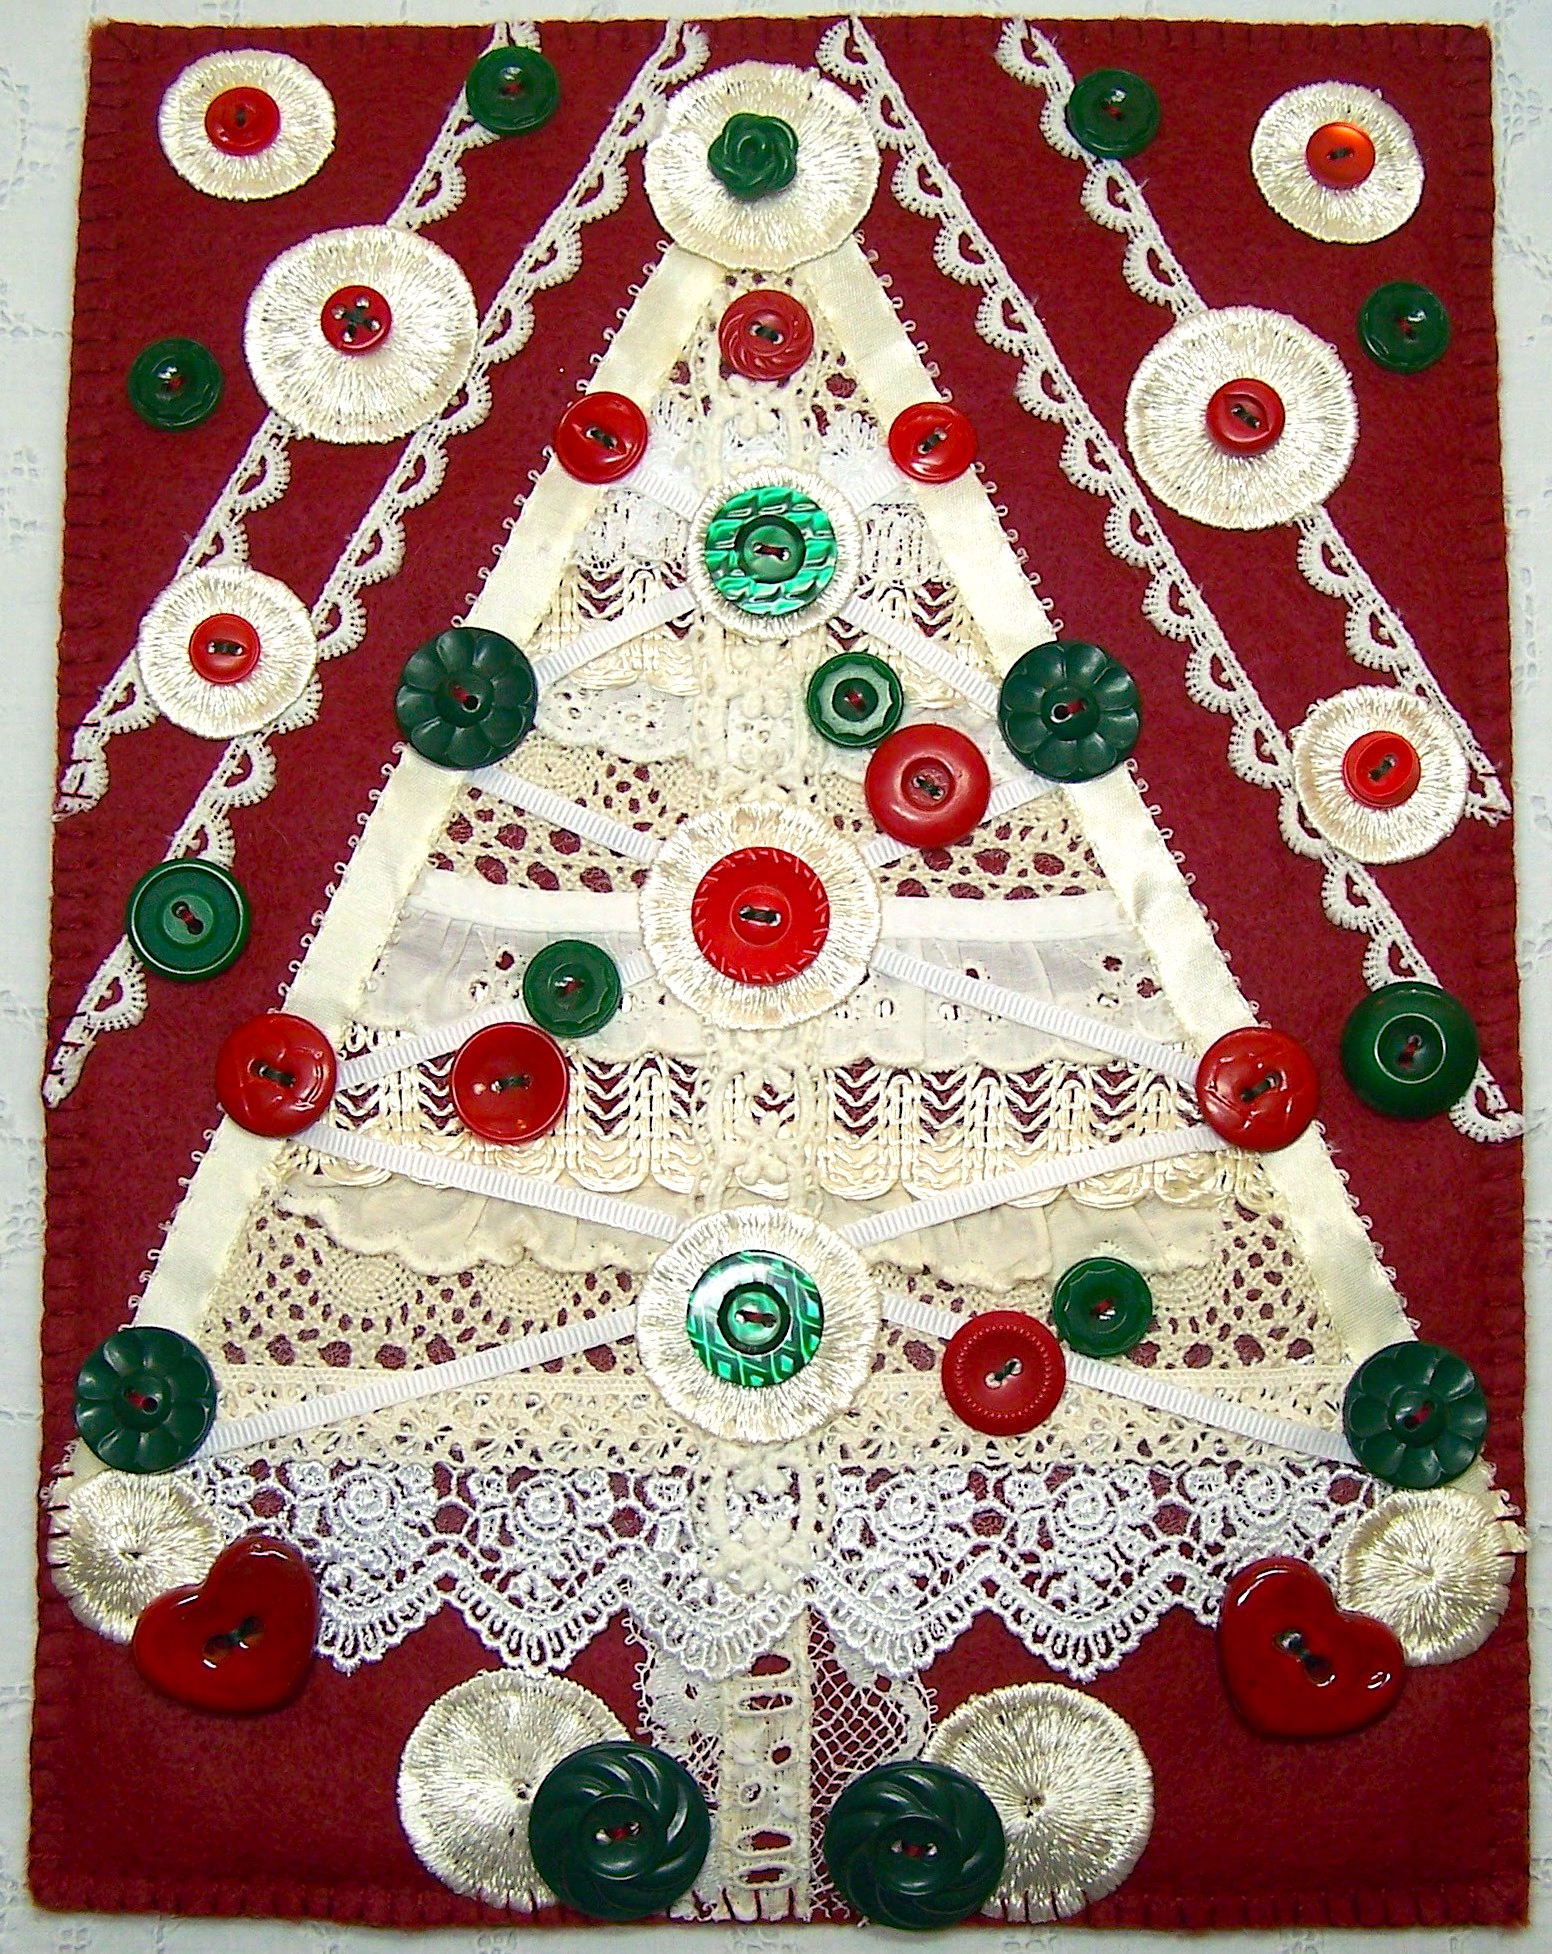
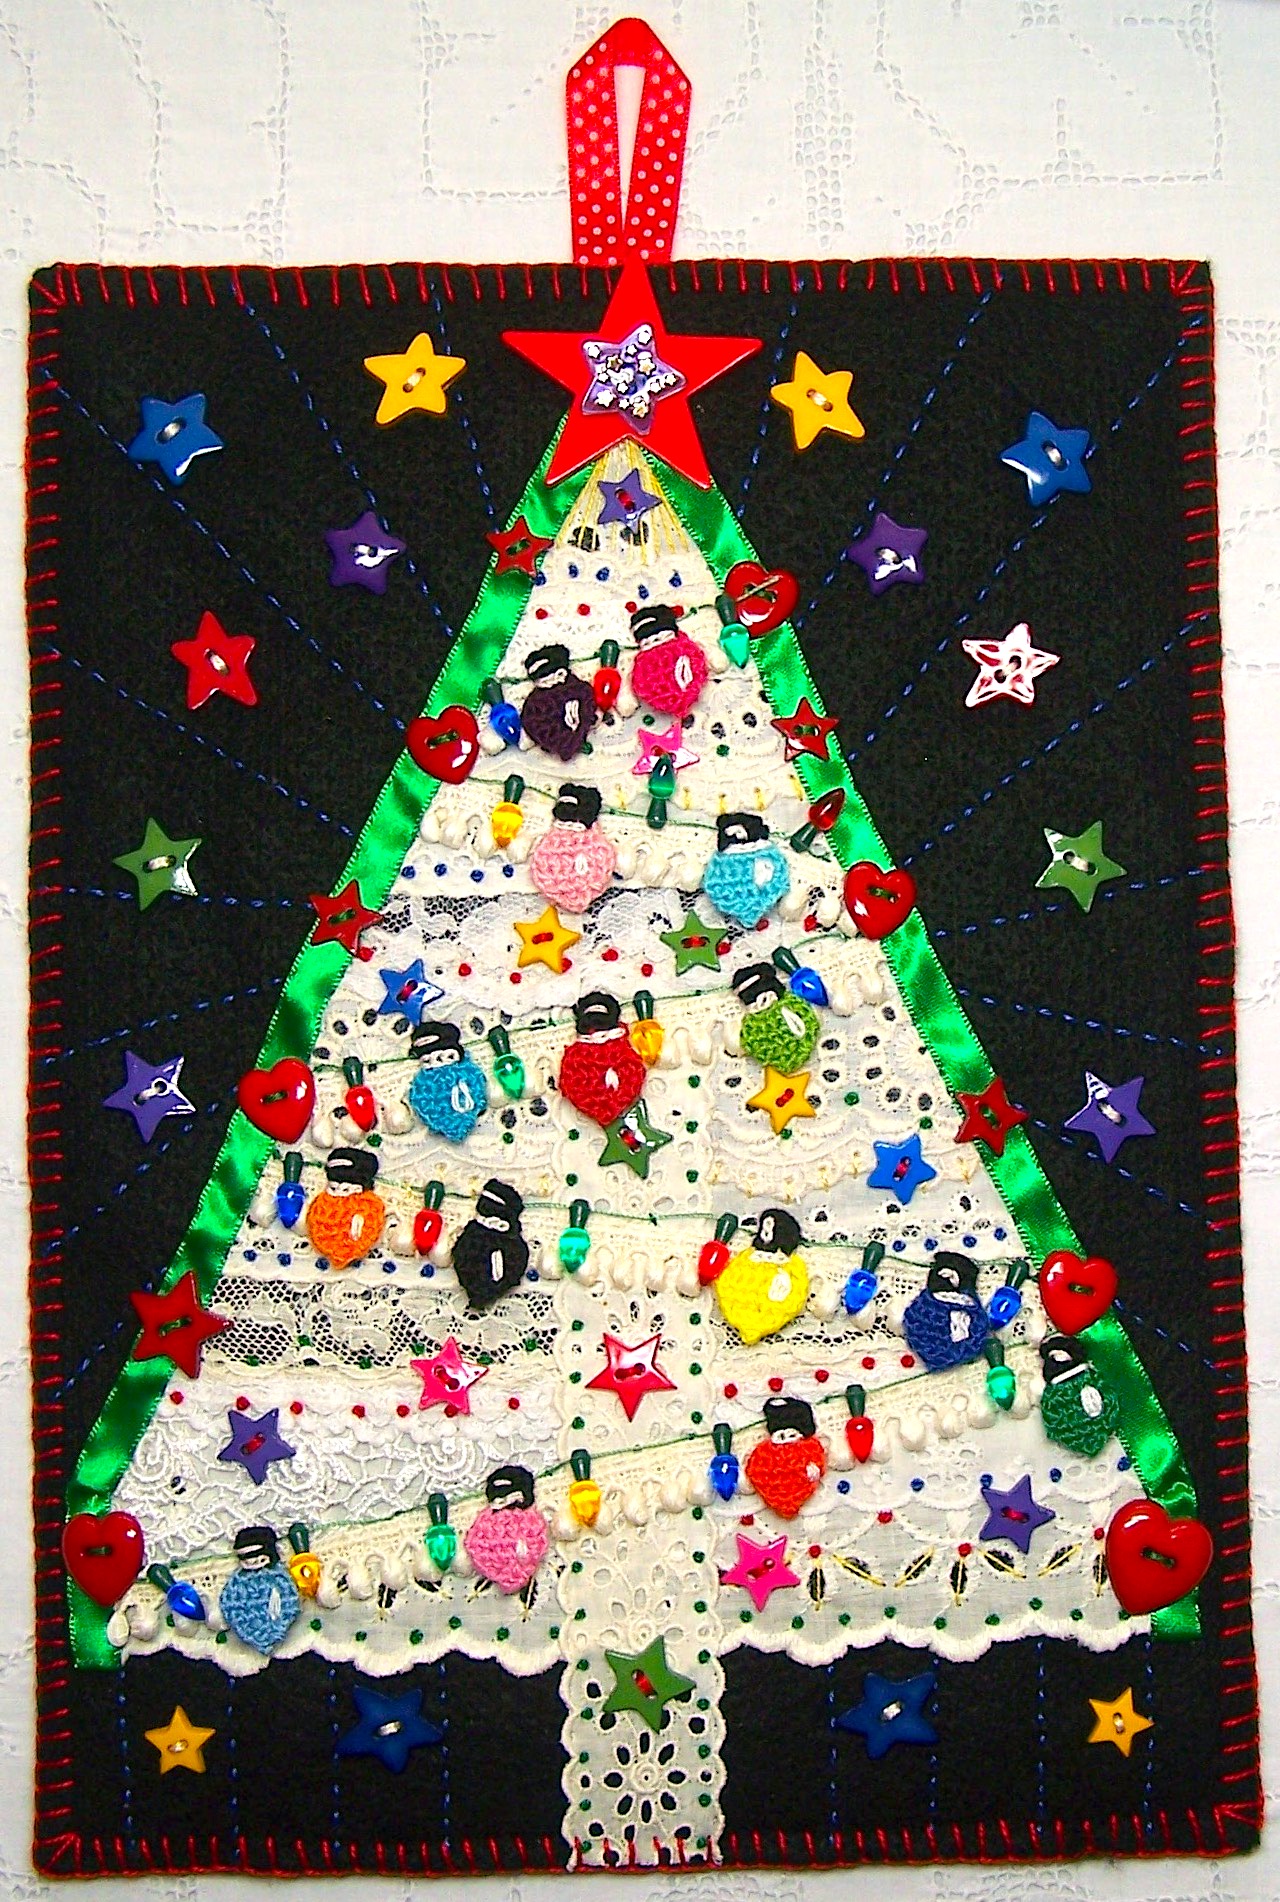
I love to decorate for the holidays. I have quite a collection of lace, buttons, and old jewelry bits, and try to find ways to incorporate them into my holiday decorations.
Metal Ornament TreeLace Christmas TreeLace and Rhinestone Cone Trees
The first tree here, is actually a metal jewelry holder, with a bowl to catch your loose bits of stuff. I have used it to display my collection of vintage mercury glass ornaments and garlands. I placed vintage tinsel garlands in the bottom of the bowl, then nestled a collection of vintage swan shaped clip-on tree ornaments around the base of the tree. I gathered together a collection of vintage dress pins and single earrings, and added these throughout the branches.
The Lace Cone Trees, are resting in a silver leaf tray, with a garland of bells wrapped around the base. There are two vases flanking this group, filled with vintage mercury glass ornaments and vintage glass beads. See my Tips and Tea on Tuesdays post December 6, 2022, for directions on how to make a cone tree.
The Lace Christmas Tree hanging at the top of the picture is comprised of bits and pieces of lace that had been a salesman’s sampler. I added additional pieces of lace, and some vintage buttons. This project is a free handout that I am offering to my readers as a gift, from me to you.
This felt project is fun, fast and easy to make for yourself or someone you love! Use up your tiny bits of precious lace, appliqués, and trims to create a hand-sewn collaged tree. The lace tree can be embroidered and embellished with stitches, buttons and more. It can be used as a pillow, or you could add a piece of ribbon to the top, for wall hanging.
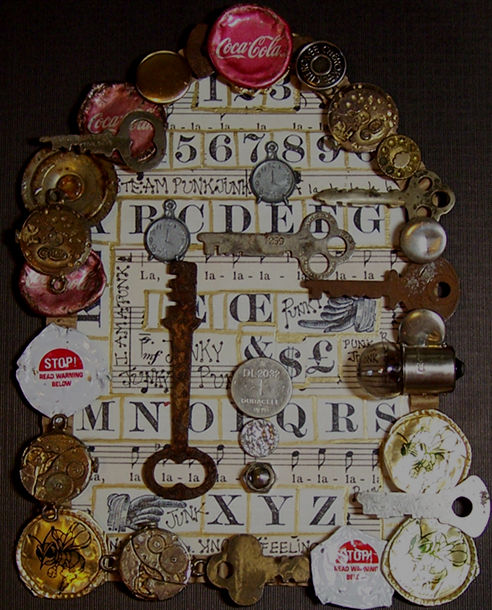
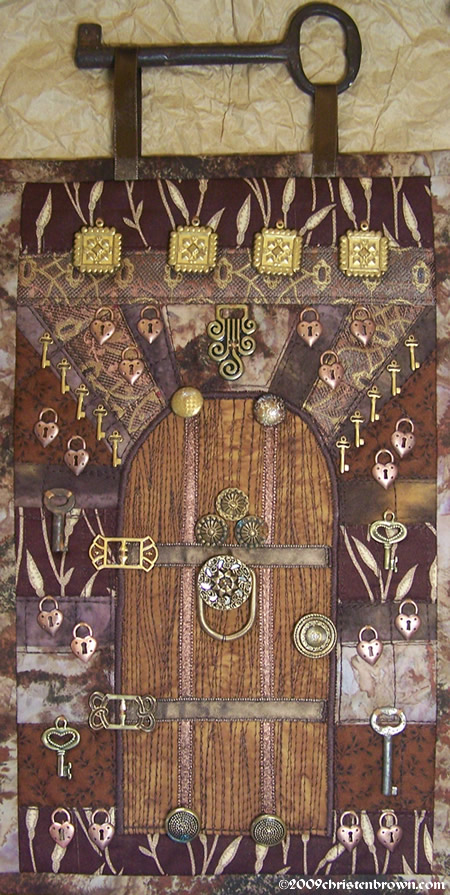
I have always loved old doors. The more worn the better, because this signified that they had been used, traveled through, experienced. And then of course, I love the accessories that a door needs, such as door knobs and keys.
This is picture, was drawn by a friend. He drew it as a wedding gift for my husband and I. I framed it with this old music sheet, that I found on The Graphics Fairy.
The romantic in me thinks of castles, and knights and damsels in distress. So I to created an image of an old castle door that had been weathered, with a big door knocker, a brass knob and big hinges. I found this old, large key on eBay, and used it for the hanger. I also found a few old skeleton keys to add in here and there, and grouped them with my newer keys and heart shaped locks. The base is machine pieced and machine quilted. The charms, keys, and buttons are attached with embroidery floss.
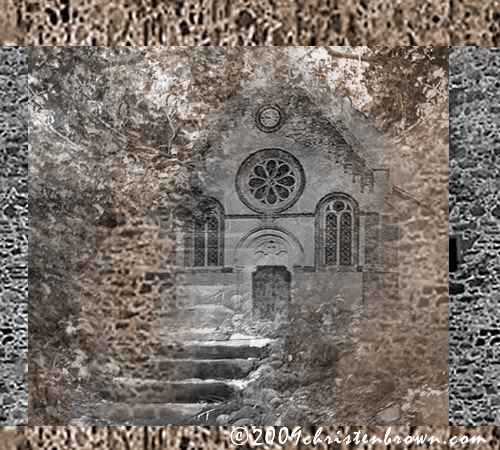
This is a digital image that I created, using many images that I had found on Pinterest. If you like to look at photographs of old doors, windows and Greece may I suggest the artist Tolis’s Flickr photostream with this door as my favorite.
I gathered this group of batik fabrics that varied from rust to brown, and thought, well this would make a cool door! I found these wonderful blue buffed celluloid buttons, which I paired with brass buttons, buckles, and both vintage and new keys. The rust and vintage blue ribbons just keep the colors flowing. The base is machine pieced and quilted, and the hand embroidery is worked in perle cotton.
Ceramic door KnotsOld KeysGlass door knobs
If you like fairies, old doors, and wonderfully illustrated books may I suggest “A Knock at the Door” by Angi Sullins and Silas Toball.