Archives

Quilt Festival Long Beach, July 2023

I am excited, and happy to announce that I will be presenting at the Quilt Festival Long Beach this year, in the Open Studios section. I will be presenting and demoing on the showroom floor, Saturday, July 8, 2023.

Saltwater Taffy Trimmings

The first demonstration will be on Embellishing with Decorative Trims from 12:00 – 2:00pm. I just created this new piece, that has many examples on how you can use decorative trims in your creative work. I will also have examples from my book, Creative Embroidery, Mixing the Old with the New.

Hooped Samplers

The second demonstration will be on Embroidering Within the Lines, from 2:00 – 4:00pm. I will be showing people how to use stencils, and other stitching aids in order to obtain a more consistent stitch. I created Hooped Samplers from the many, many, many, samplers that I stitched while teaching my class The Embroidery Corner, at Beverly’s Fabrics, (sadly and alas, this is not a class that I teach currently). I will have additional samplers, and examples from my book Hand Embroidery Dictionary.

Hope to see you all there!

Happy Stitching to you all ~Christen

A Heart a Day: 11

Heart Felt Wishes to you all! I love hearts, I love the shape, I love to decorate the house at Valentine’s Day, and I have a lot of hearts… so I decided to post A Heart a Day for the entire month of February.

crazy pieced base with embroidery

For the love of embroidery, and threads, and beads, and silk ribbon, and buttons, and trims, and for all of the things that make you happy, and inspire you to be creative.

Happiest of heartfelt wishes for a wondrous day! ~Christen

Friday’s Favorites: Scarves

I love scarves! And with the cold weather still out, I am constantly in search of that little bit of extra warmth and color. Being allergic to wool can sometimes be a challenge to find just the right thing for an outfit, so I am always on the lookout, and often I make my own accessories or re-style or revamp an already made item.

This chiffon scarf was a gift from my husband and daughter, along with a box of Godiva chocolates. How could you go wrong with yummy chocolate and my favorite color purple! I added satin rosettes and posies using the directions from my book Ribbonwork Gardens, by C&T Publishing.

This is a scarf that is entirely made from Hanah Silk bias ribbon. Several different widths were used, and stitched together on the sewing machine. The ruffled roses are hand-stitched, and are also made from silk bias ribbon.

This is a scarf that I knit, using yarn that was made from silk sari borders. It has a lively color combination, lots of colors and fun nubby sections. I made folded edge rosettes from hand-dyed silk velvet ribbon. The centers of the flowers are abalone shell buttons.

This scarf was purchased many years ago at Cost Plus, now it is called World Market. It is incredibly detailed with rickrack ribbon stitched into flowers, sequins, and beads! To top it off I made another flower from my book Ribbonwork Gardens, using ribbon that came off another box of Godiva chocolates.

Happy Stitching to you all, and Enjoy~ Chisten

Lace Christmas Tree: Free Handout

This felt project is fun, fast and easy to make for yourself or someone you love! Use up your tiny bits of precious lace, appliqués, and trims to create a hand-sewn collaged tree. The lace tree can be embroidered and embellished with stitches, buttons and more. It can be used as a pillow, or you could add a piece of ribbon to the top, for wall hanging.

You can download the free PDF handout here.

Happy Stitching ~Christen

Beading Threads and Needles

Threads

Beading threads are used to stitch the beads in place on your fabric or into bead woven forms. When used for bead embroidery, the thread is used double, with a knotted tail. When used for bead woven stitches, the thread is used single, unless the directions state otherwise.

  • Silamide comes either on a card, or on a spool, which makes it easy to cut off the desired length.
  • Nymo and S-lon come on a small bobbin.

Thread Holders

  • The June Taylor thread holder can be used for a spool of Silamide, which also has a convenient place for your scissors and needles.
  • An unused lipstick holder, makes for a great storage case for loose bobbins. Pull a short length of thread, close the lid and cut off the length needed.
  • A T-pin can be used to hold the bobbin onto a pincushion, pull the thread off as needed.

Needles

Beading needles are fine and thin and most commonly found in sizes 10-13. The needles come in long and short lengths.

  • Use a refrigerator magnet to keep your needles organized while working on a project
  • To store your needles, cut an empty plastic bead tube, to fit the size of your needles.

Happy stitching to you! ~Christen

PS: If you are looking for inspiration or ideas, check out my PDF Classes and books.

Ribbon and Ribbonwork Flowers, Leaves, and Trims

I love to work with ribbon, ribbon, and more ribbon.

These are examples from my first book, Ribbonwork Gardens by C&T Publishing. There are 122 realistic flowers, leaves and garden extras included in the book, with experience levels from easy to advanced.

There are over 14 basic techniques, some traditional and some that I have created especially for this book. There is a complete compendium with ribbon styles, selection and care, and troubleshooting tips with several gallery pages and examples sprinkled throughout the book for inspiration.

These are examples from my second ribbonwork book, Ribbonwork Flowers, by C&T Publishing. There are 132 flowers, leaves, and garden extras – each with complete instructions and colorful how-to photos.

I have created these components using new twists on vintage ribbonwork construction, as well as creating new techniques of my own. The book includes flowers, petals, leaves, flower centers, fruit, and stem designs. There are several gallery pages and examples sprinkled throughout the book for inspiration.

ribbonwork trims, ribbons, details, gingerbread trims

This is an example of my class, Gingerbread Details and Decorative Trims. Many of these edgings and trims use vintage techniques turning ordinary ribbon into detailed extraordinary couture trims. The simple techniques that are used to create these decorations range from folded, braided, wrapped and sewn.

Happy Stitching! ~Christen

Friday’s Favorites: Fall Colors

14 3/4″ x 13 3/4″

Batik Galaxy by Christen Brown

This piece started with the a group of batik fabrics in dark mustard, teal, and cranberry/rust. The cranberry/rust fabric reminded me of the red ring around Mars, so I created a galaxy in the center of the piece, using a wholecloth reverse applique technique. The copper and antiqued brass finishes of the celestial-themed charms added an extra color element. This piece can be found in my book, The Embroidery Book by C&T Publishing.

11 1/4″ x 12 7/8″

Umbria by Christen Brown

This piece started with four printed fabrics in rich browns, rust, and cranberry colors. I found a variegated perle cotton that picked up all of those colors. I then chose the remainder of the embroidery and embellishments to match the thread. Embellishments include vintage shell buttons, copper charms, and glass buttons that are sprinkled around the fiber and metal leaf trims. This piece can be found in my book, The Embroidery Book by C&T Publishing.

17″ x 16 3/4″ (close-up)

Autumn Ribbons by Christen Brown

The base of this piece started with a linen napkin, and added bits of vintage lace that I hand-dyed with Colorhue dyes. I then added in loads of rust, orange, and brown flowers and leaves that I hand-stitched from Hanah silk bias ribbons. I used techniques that can be found in my book Ribbonwork Flowers by C&T Publishing. The embroidery was worked with perle cotton, Wildflower threads, and silk embroidery ribbon, using many of the stitches that can be found in my book Embroidered and Embellished by C&T Publishing.

24″ x 23″ (close-up)

Harvest Quilt by Christen Brown

The base of this quilt was strip-pieced using Hoffman cotton batiks, in rich autumn colors of rust, umber, cranberry, maple, and olive. The embroidery stitches are worked in perle cotton #5 and #8, Wildflower threads, and cotton floss. This piece was featured in the gallery section of my book Embroidered and Embellished by C&T Publishing.

Enjoy! Happy Stitching! ~Christen

Ribbon Embroidered Brooch: class/tutorial

Ribbon Embroidered Brooch: 1 lesson/ $25.00

ribbon embroidered broochThis pretty little brooch is the perfect size, to be given as a gift or to keep for yourself. Four basic embroidery stitches will be covered: woven rose, chain stitch, lazy daisy, French knot.

ribbonembroideredbrooch

Skill Level Beginning: hand-sewing and embroidery skills a must

Class Information

This class can be purchased at any time, there is no set schedule. The class can be ordered by contacting Christen: thestoreonthecorner@gmail.com. She will send you an invoice through PayPal.

Once the class is paid for, the supply list and handout/s will be sent out.

A high-speed internet connection is recommended, and you must have basic computer and internet skills. You will need to be able know how to download and save a document to your computer’s hard drive, open it, and print out a copy.

You can contact Christen with any questions pertaining to the class/class information throughout the length of the class.

Class fees will not be refunded.

Happy Stitching! ~Christen

Tidbits and Tats: class/tutorial

Tidbits and Tats: 1 lesson/$30.00

tidbitsandtats1

Tidbits and Tats is my version of the popular “snip rolls”. This is a fun, fast and easy project to make for yourself or someone you love! Perfect for you to use your tiny bits of precious lace, fabric, ribbon, appliques and trims to create a hand sewn collaged base. The lace base can be embroidered and embellished with buttons, sequins and charms. You can add in your own flare with other items such as fabric yo-yo’s and ribbonwork flowers.

tidbitsandtats2

Skill Level Beginning: hand-sewing and embroidery knowledge needed

Class Information

This class can be purchased at any time, there is no set schedule. The class can be ordered by contacting Christen: thestoreonthecorner@gmail.com. She will send you an invoice through PayPal.

Once the class is paid for, the supply list and handout/s will be sent out.

A high-speed internet connection is recommended, and you must have basic computer and internet skills. You will need to be able know how to download and save a document to your computer’s hard drive, open it, and print out a copy.

You can contact Christen with any questions pertaining to the class/class information throughout the length of the class.

Class fees will not be refunded.

Happy Stitching! ~Christen

Tide Pools Nature’s Treasures

Tide Pools Natures Treasures

Tide Pools Nature’s Treasures

Being a native of Southern CA., a shell lover from early child hood, and an avid collector I am drawn to the ocean, the sand, the waves, the tide-pools and all of the treasures that you can find.

beach sand

I started my project with birch bark collected many years ago from our cabin outside of Toronto, Ontario Canada. This I used for the sand, and the inside of the bowls.

I then crumpled up pieces of cotton paper to create the waves, and rocks. I stitched these together with cotton and rayon threads on my sewing machine. I placed this on an old wooden tray, that had seen better days.

The next step was to create the actual tide pool rock formations that capture the sea life and shells.

I started with Timtex and more cotton paper. I cut round shapes in three different sizes. I layered cotton paper over these, and cut out round pieces of birch bark for the center of the bowls.

I stitched the layers together on the sewing machine. I then cut darts into the circles, and over lapped these to form the bowl shape. The last step was to cut the edges of each bowl and then machine stitch over these edges.

shells, sea life and kelp

shells, sea life and kelp

I had an abundance of real shells that I had collected over the many years of beach combing. I had a great time selecting which of these would be included into my beach scene.

I also had some old celluloid buttons that were somewhat grungy, but the colors matched and the patterning looked like sea urchins to me, these are interspersed amongst the bowls.

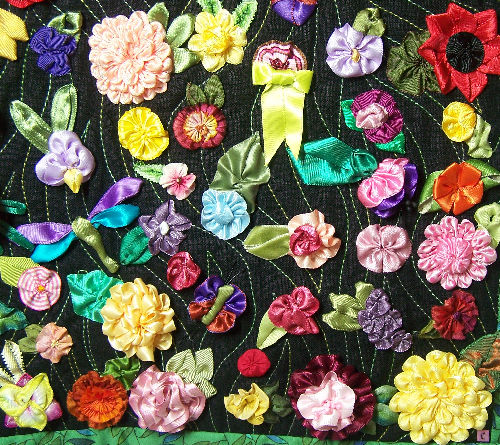
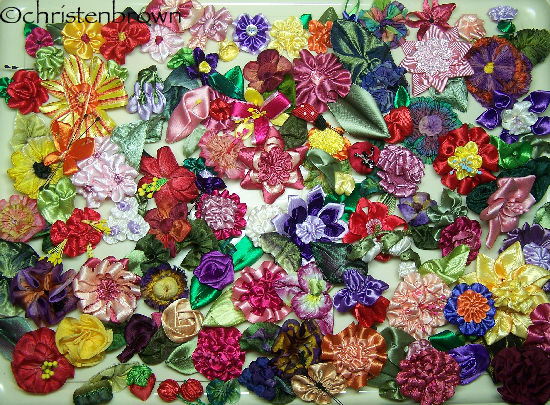
I thought that it would be cool to include shells and sea life that I had made from ribbons, crochet and embroidery. I started to play and this is what I came up with:

  • A crochet length of kelp with cord and pearl cotton, and grape shells at each leaf (these have a florist wire glued in the center to attach to the kelp)
  • Crochet and embroidered snail shells
  • Embroidered sea urchins, sea anemones and limpet shells
  • Embroidered and gathered ribbon coral
  • Ric-rac coral and star fish
  • Plumes of something made from rayon cord (I am not sure what these are but I liked them)

close-up view of three sizes of bowls

close-up view of three sizes of bowls

Happy beach combing and treasure hunting, enjoy- Christen!