Tag Archive | lace

Creative Embroidery, Mixing the Old with the New, Book Promotion: Day 2

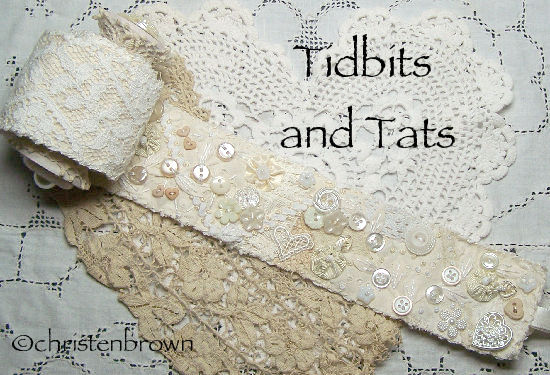
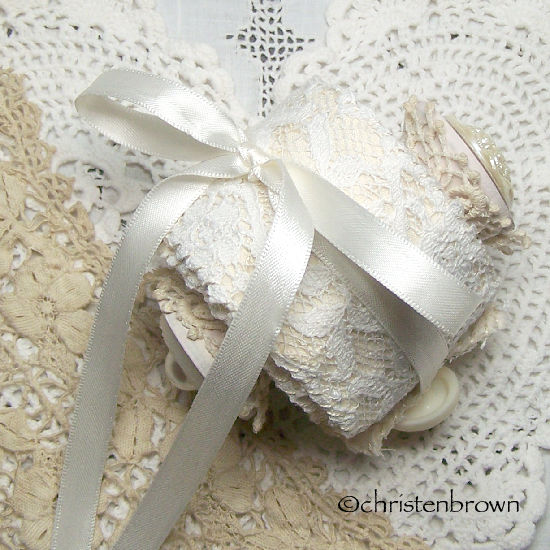
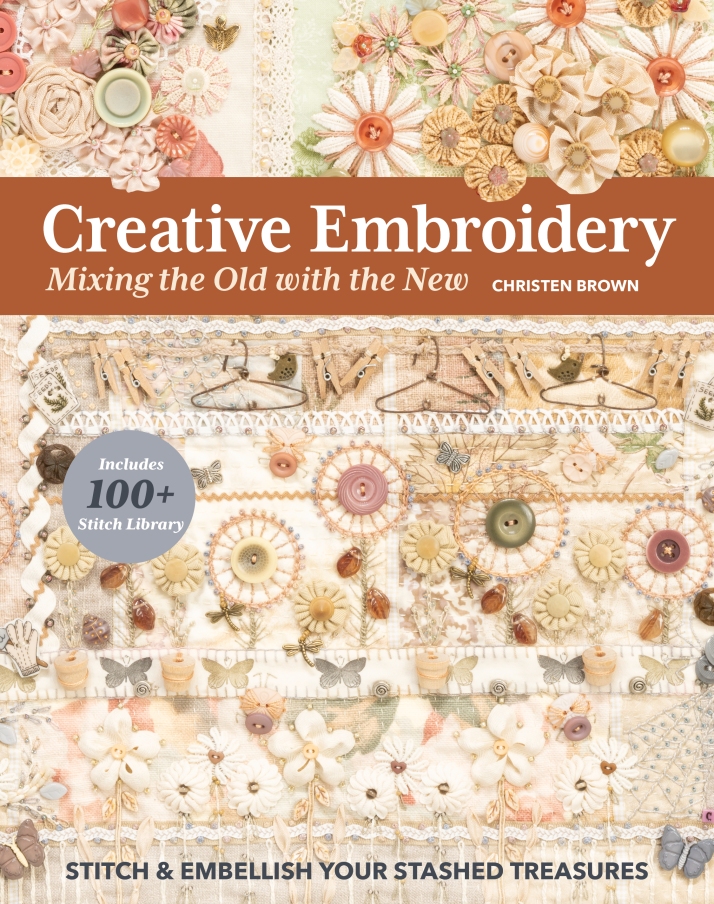
I have a new book coming out in March 2023, Creative Embroidery, Mixing the Old with The New. The emphasis of the book is to create something new from your vintage and new stash of fabrics, hankies, table linens, doilies, laces, appliqués, trims, ribbons, threads, buttons, beads, notions, and more.

Book Blog and Social Media Tour Details

The following hosts of the blogs and Facebook pages listed below, are offering a chance to win a free copy of the eBook. Visit each listing on the day of the tour that they are hosts, and enter the drawing for a chance to win!

Today you have a chance to win at Create Whimsy, Facebook.

Don’t forget to hop on over, and good luck!

Round Robin Groups

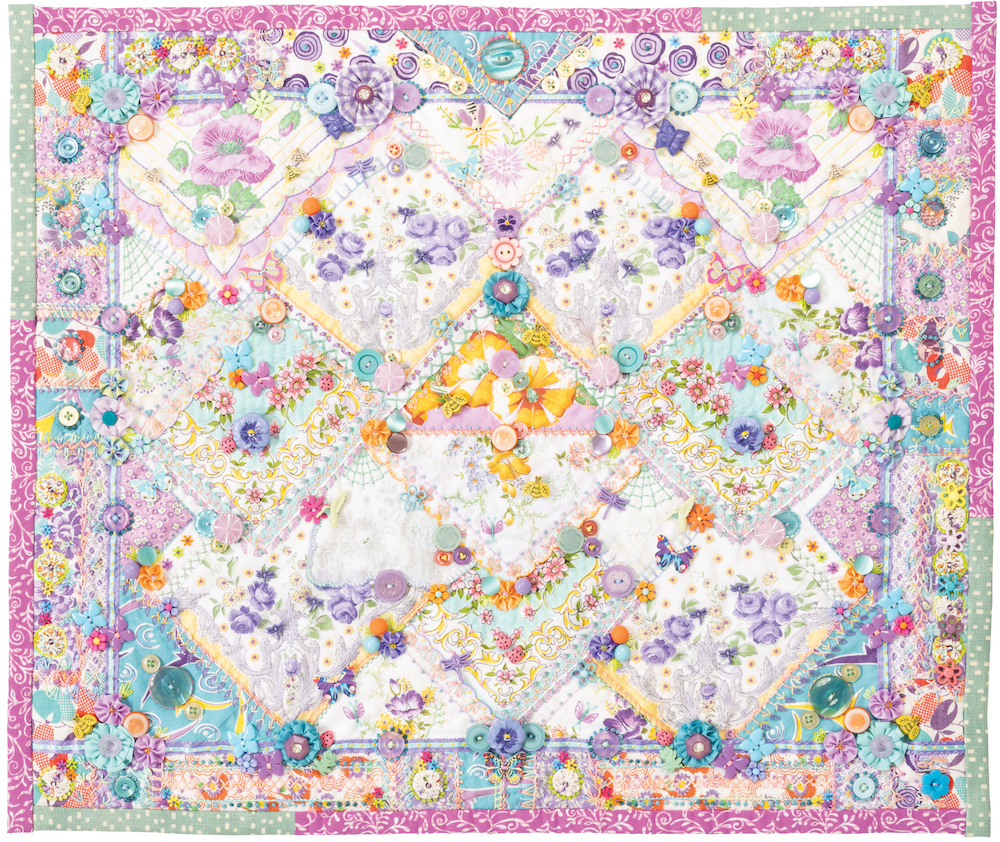
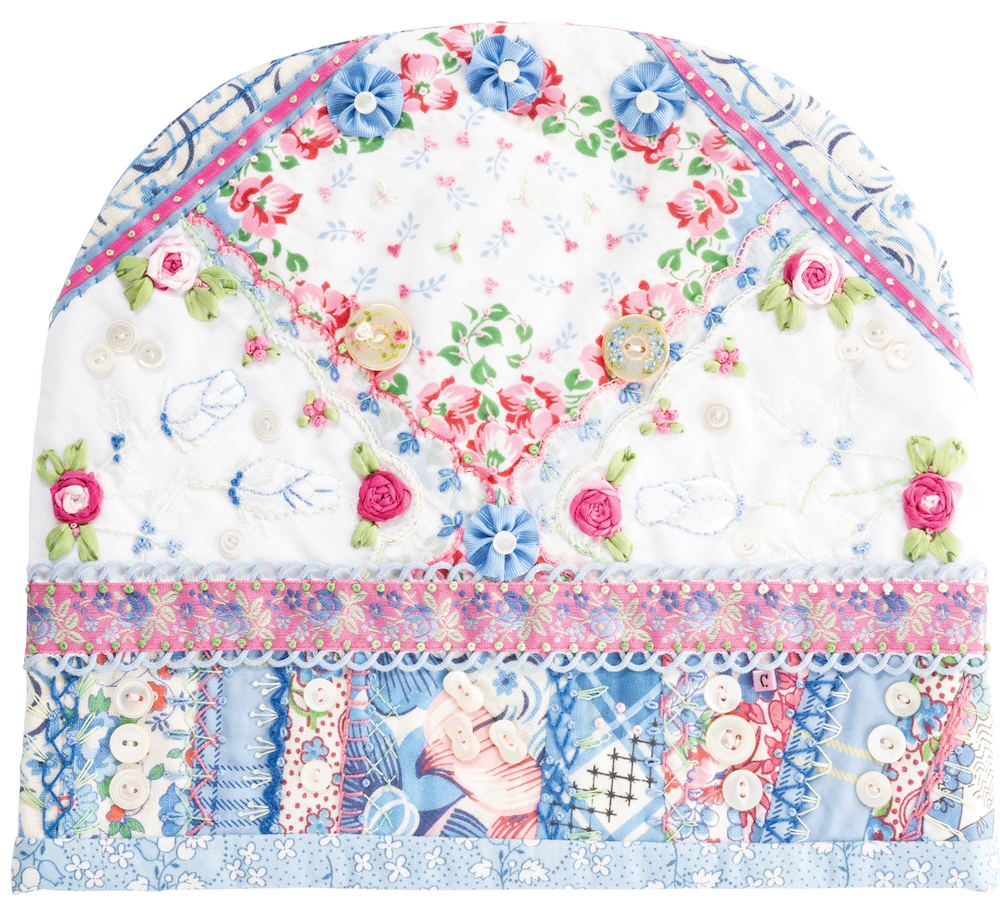
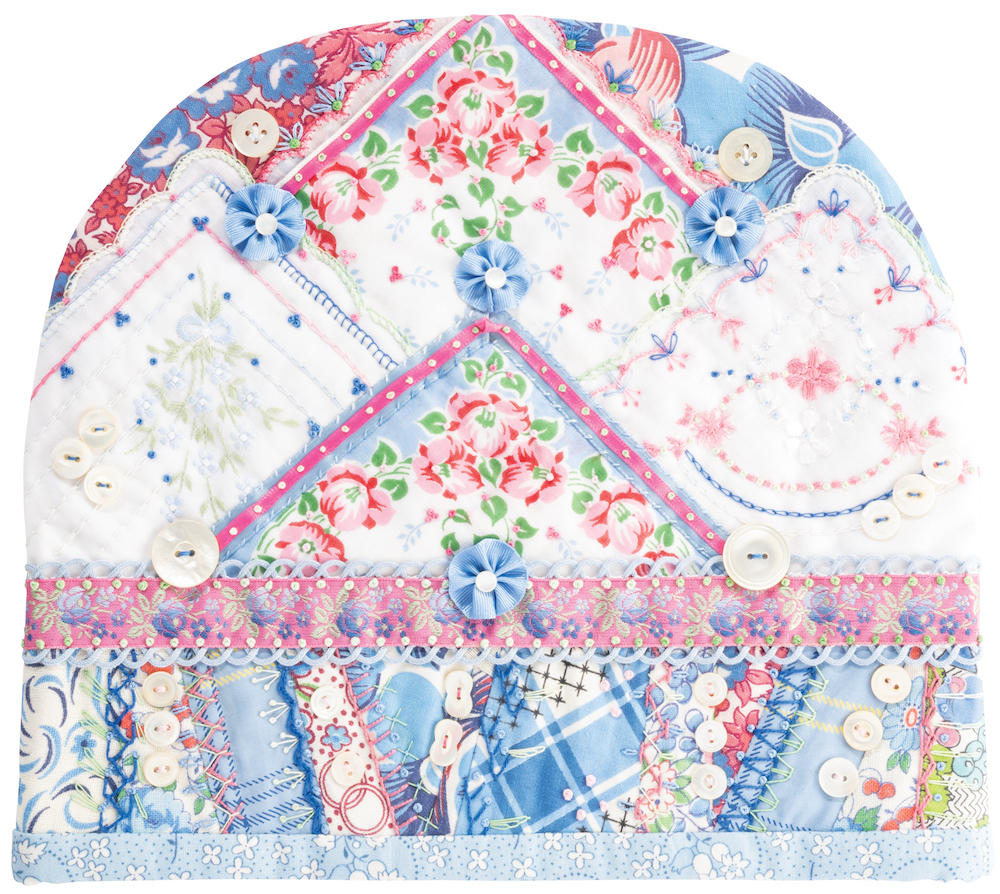
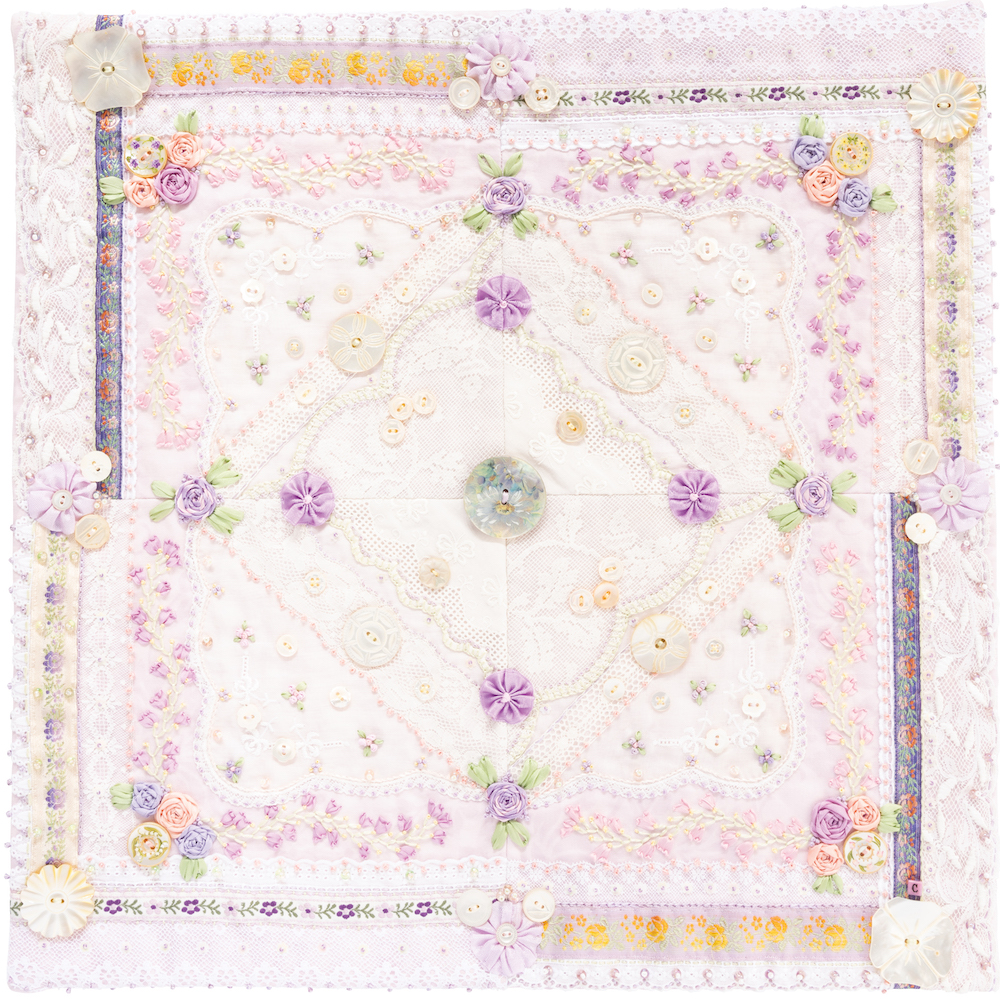
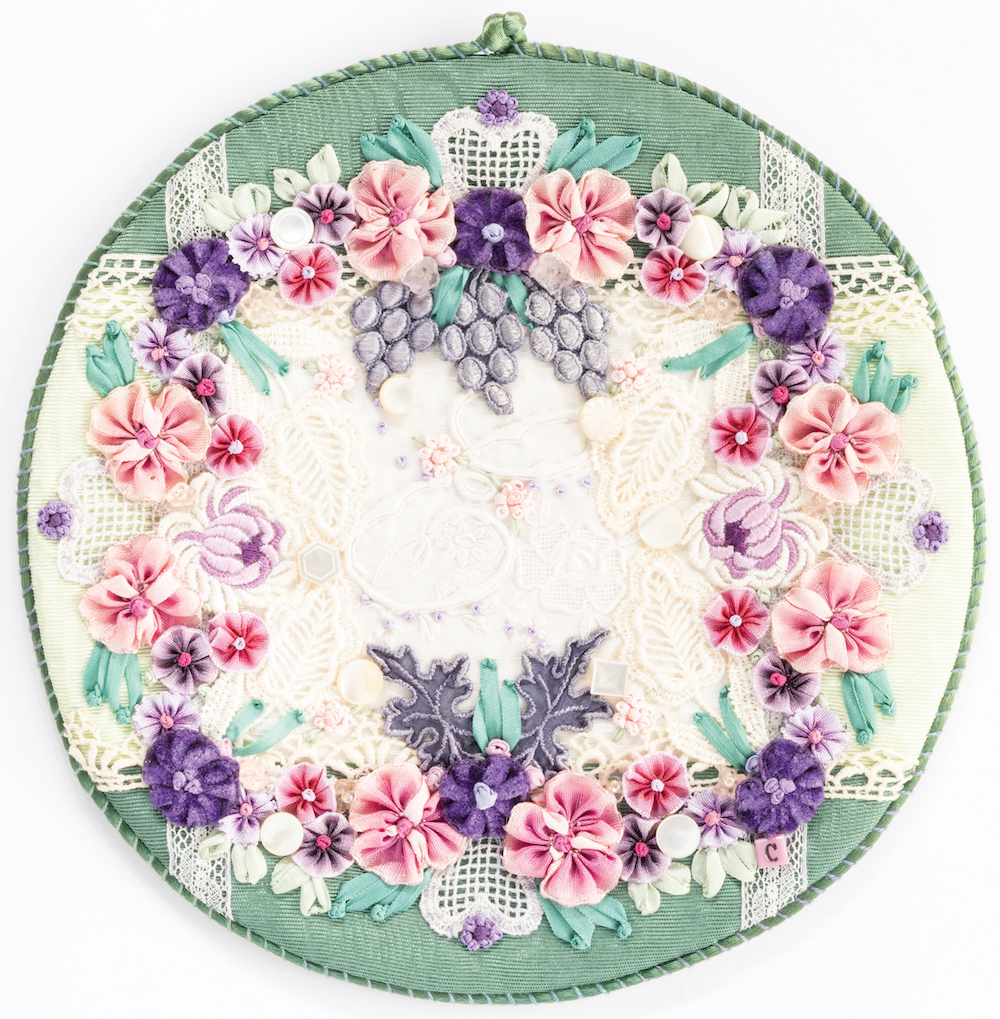
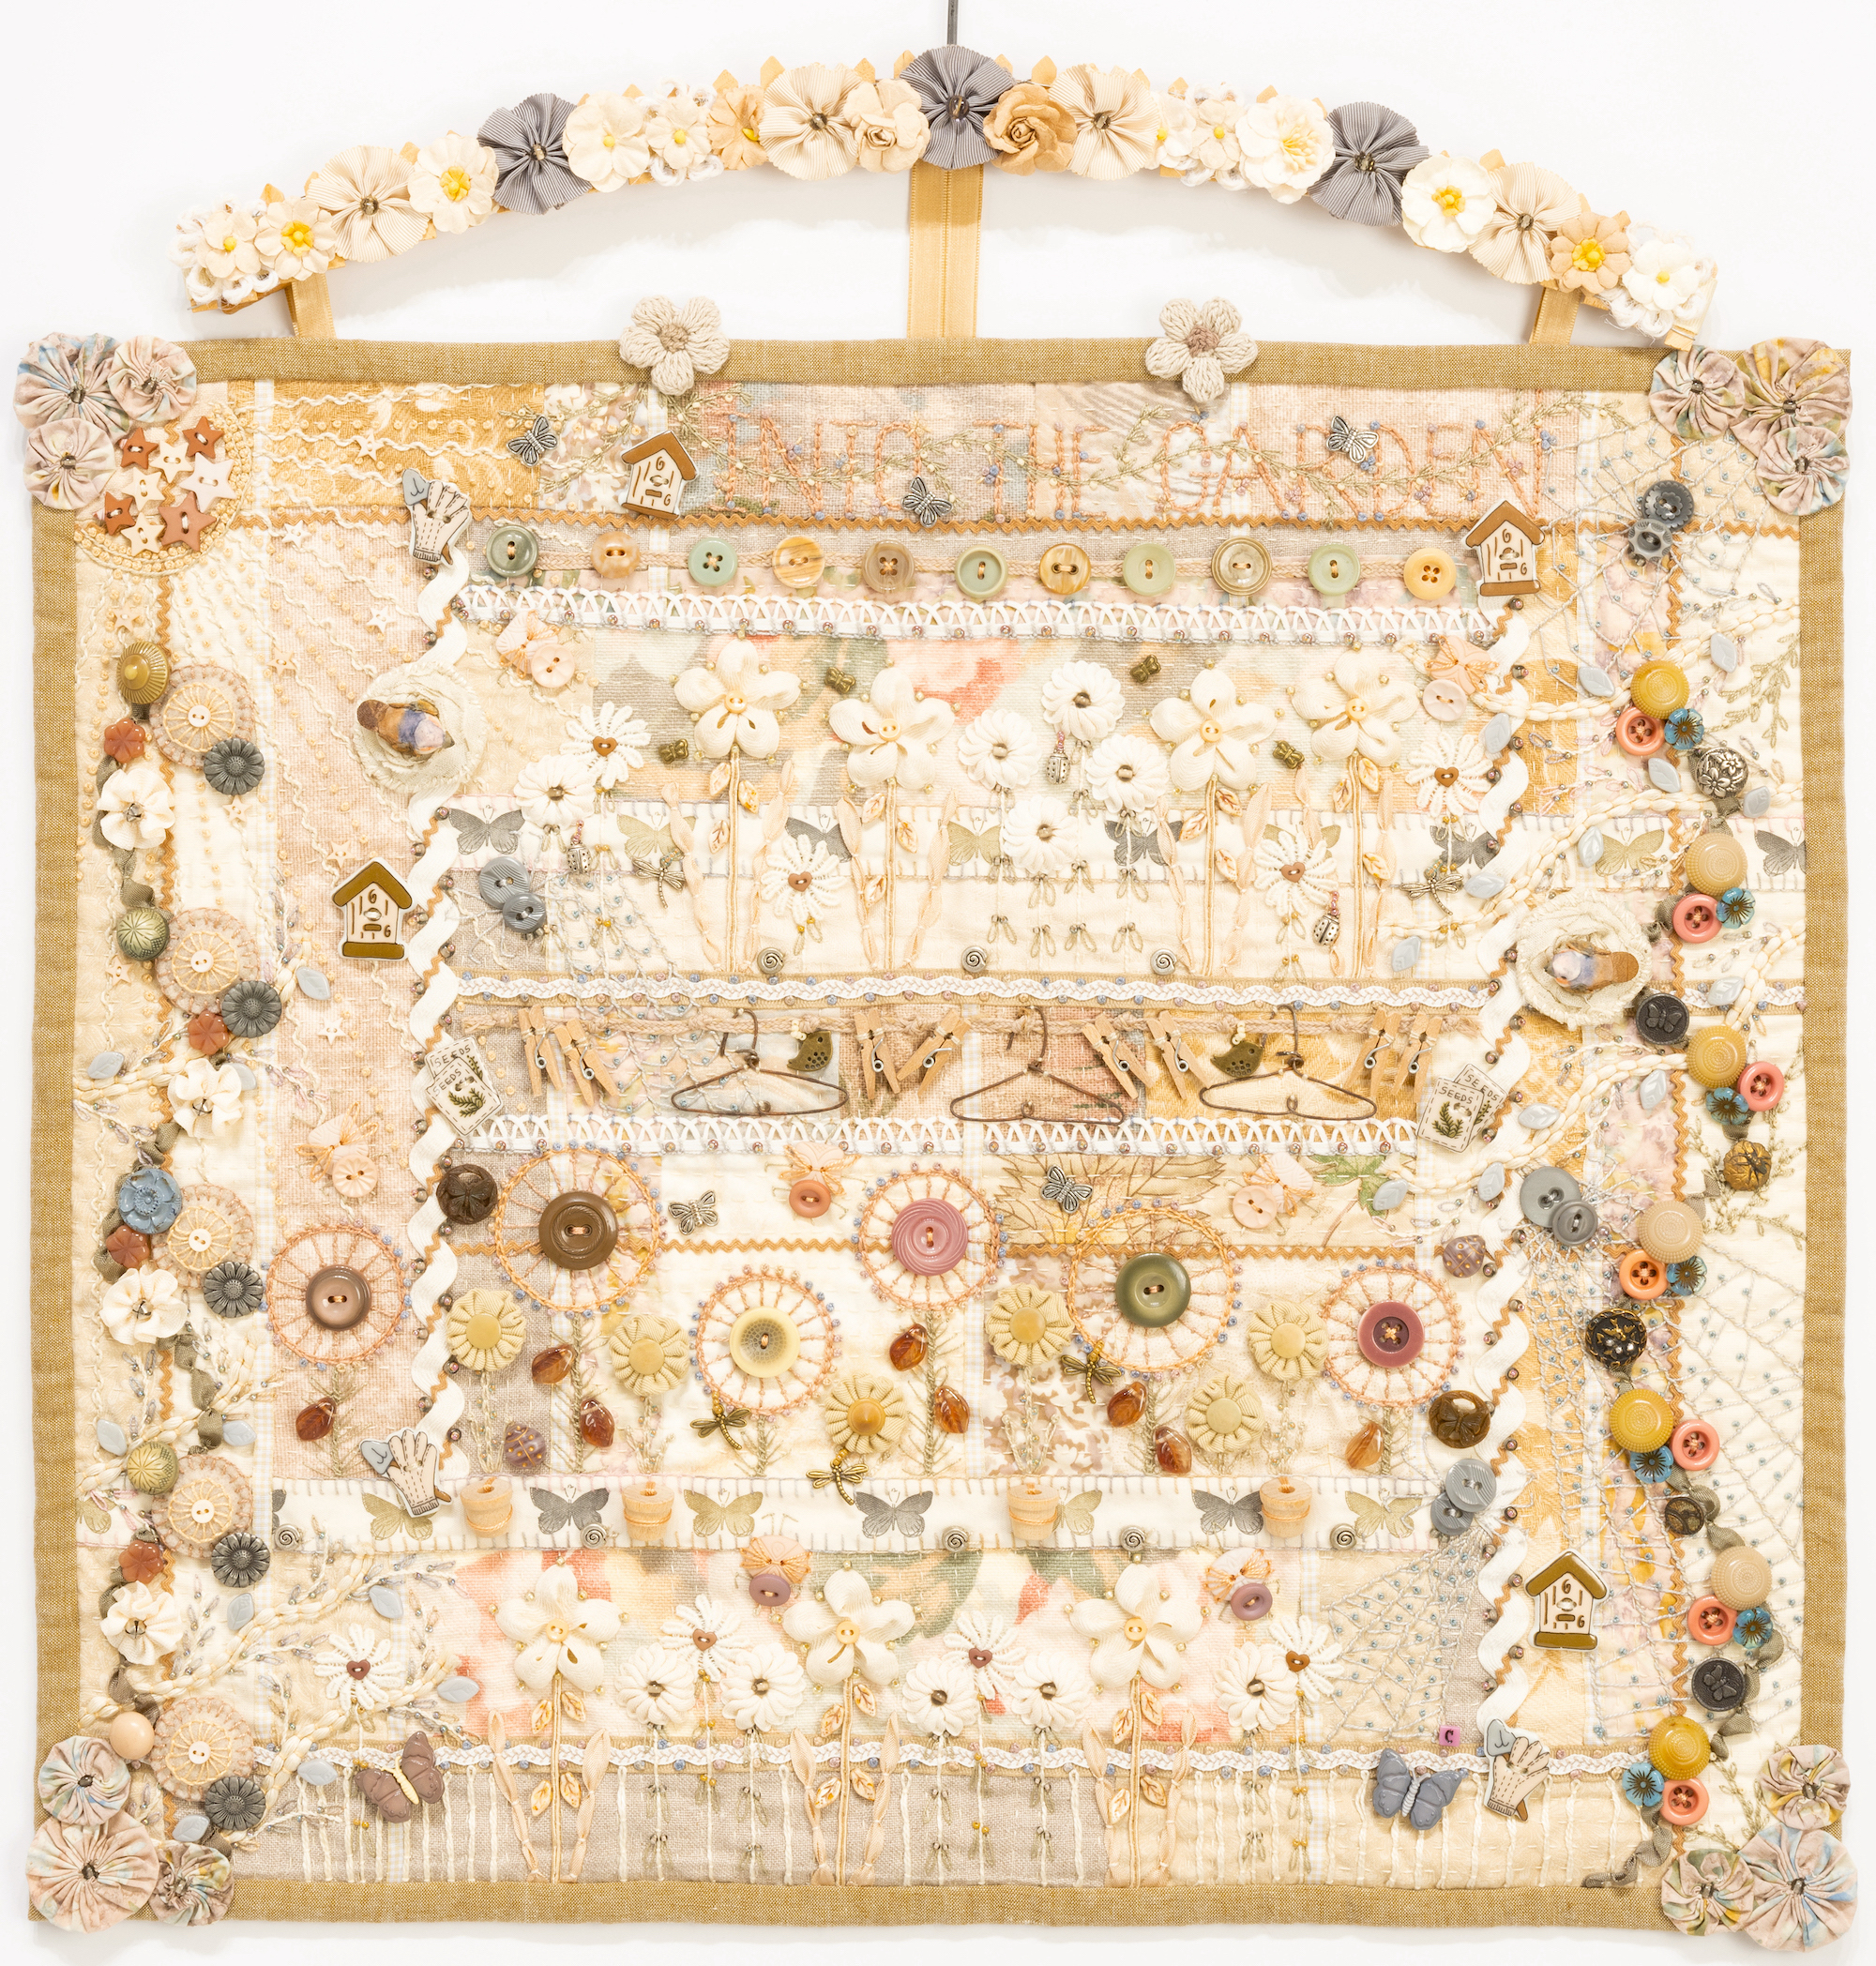
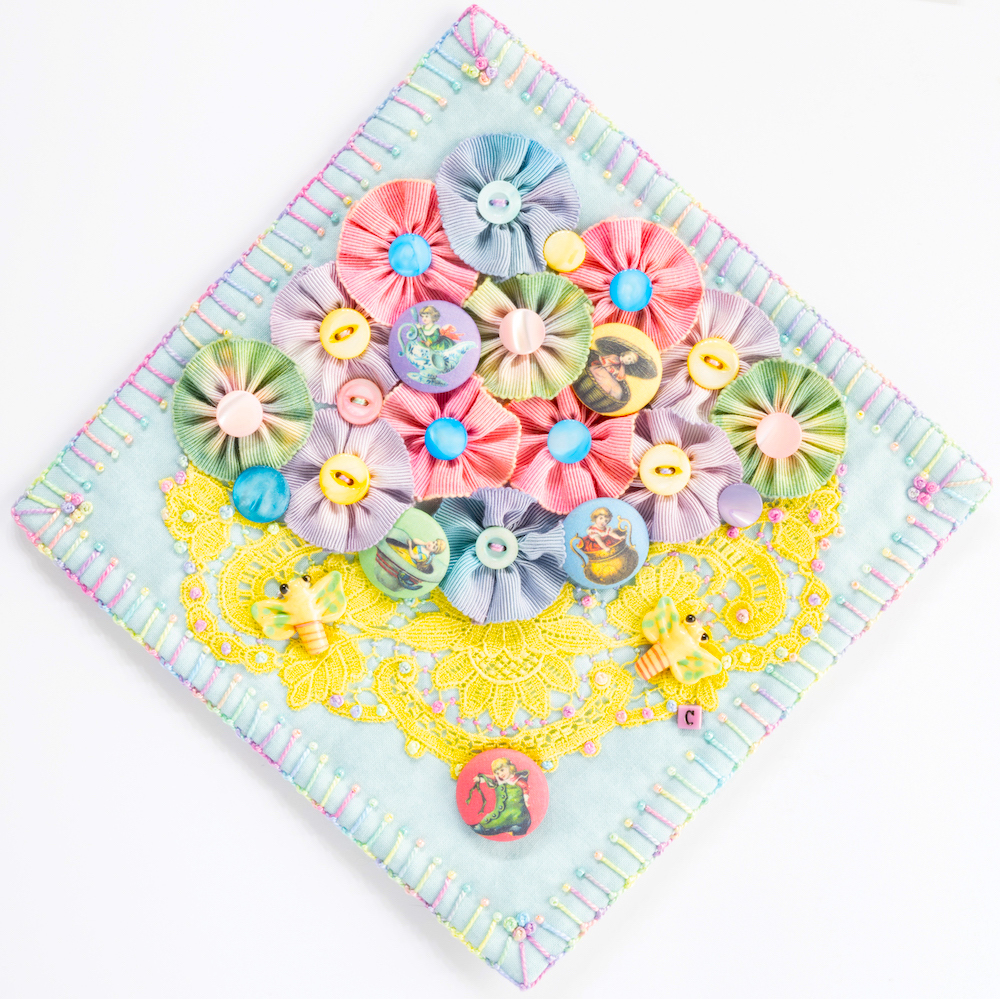
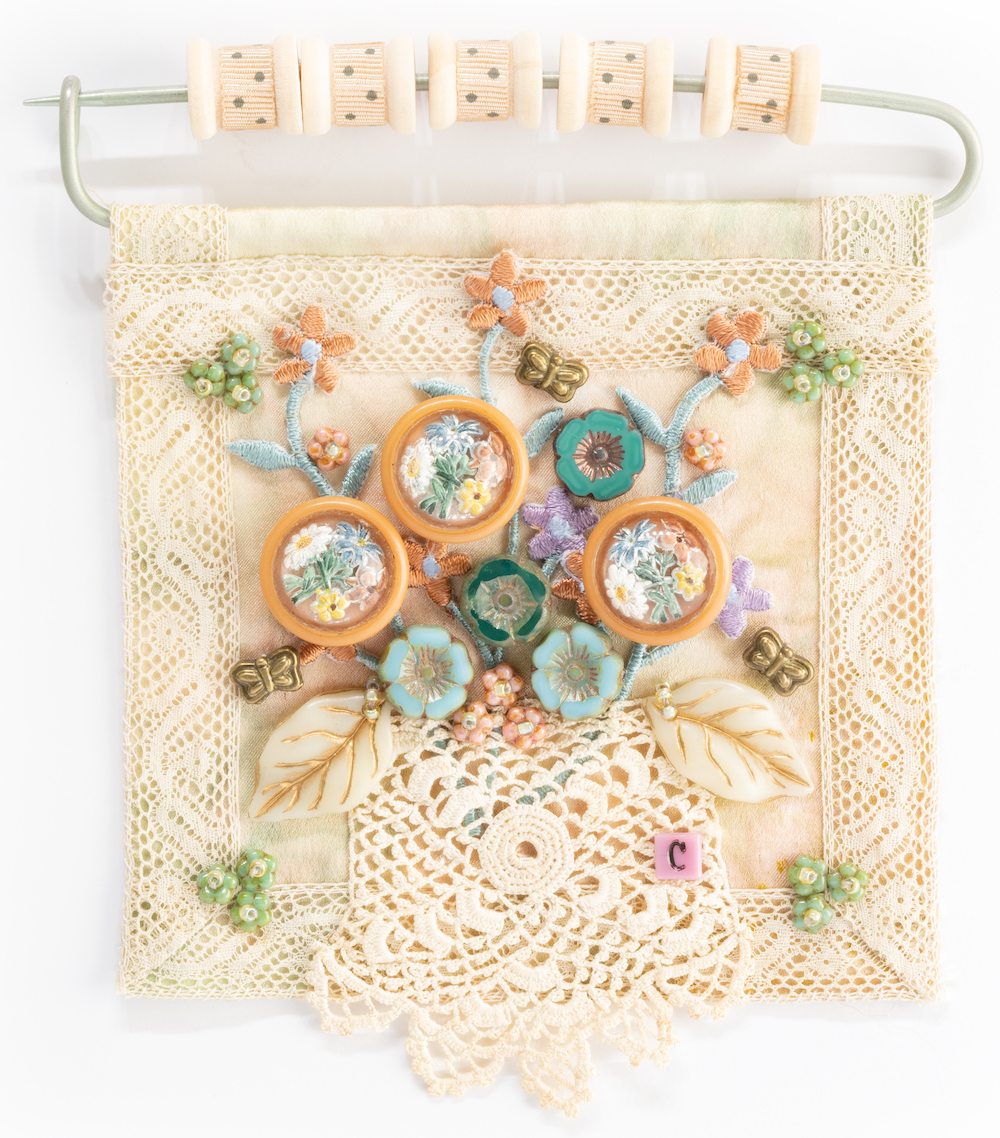
To help me promote the book, I asked a few good friends to participate in a Round Robin Group block exchange. So, what is a “Round Robin”, and how did this project get started? I asked each artist to create a 10”- 12” pieced square, using any type of fabric and color combination. The construction could also include doilies, laces, or ribbons, and then the embroidery and embellishments stitches included in the book. Once the block was created, they sent the block to the next person in the group, including the threads and embellishments that they wanted to include on their block. Then the block traveled on to the next participant in the group, and then back to the owner.

The participants of the first Round Robin Group, Washington to Oregon to Texas were founder, artist, and teacher Lynn Woll of Create Whimsy, and her friend and colleague Chardel Gibson Blaine, an artist, teacher and owner of Flying Goat Studio, who teamed up with my friend of many years,  Patti Medaris Culea, a fiberart and cloth doll artist, teacher and author.

Here is Lynn Woll’s block. She started with a square of linen, a green fabric doily with a multi-color crochet edge and a smaller crocheted doily. Inspired by Mandalas, she attached the green doily onto the linen, then stitched the smaller crochet doily into the center. Her block traveled to Patti Medaris Culea, then to Chardel Blaine.

The block is now back with Lynn and she says: “Who knew that two vintage doilies could create such a peaceful embroidered work. I find the piece calm and comforting and plan on finishing it as a small wall art piece.”

If you would like to read more the details of each block see the original post that I wrote, Creative Embroidery, Round Robin 1 Washington to Oregon to Texas, for C&T Publishing.

Happy Stitching! ~Christen

Friday’s Favorites: Hankies!

What more can I say? I have a selection of pieces to show you today, from my upcoming book, Creative Embroidery, Mixing the Old With the New, by C&T Publishing. Some of the pieces are gallery examples, some are examples of the projects included in the book.

Vintage hankies can be layered to create a collage base or can be combined with other fabrics. These are often made from cotton, cotton batiste, linen, and silk fabrics.

Bella Fleur Mouchoir (Beautiful Flower Handkerchief): The base of this wallhanging is made from vintage hankies that had belonged to my mother. I combined the hankies with scraps of vintage feed sack and new cotton fabrics, and satin ribbons. I embroidered stitches around the edges of the hankies and ribbons and the seams of the pieced fabric. I made ribbonwork flowers using vintage cotton bias tape and woven ribbons. This piece is adorned with vintage and new plastic buttons.

Tea Cozy: This is a Stash Project that uses hankies, ribbons, and bits of fabric. Three embroidered hankies and one printed hanky were combined with vintage feed sack fabrics to create the front and back of the base. Vintage jacquard and satin ribbons were used to cover raw edges and to make ribbonwork rosettes. The embroidery is worked in perle cotton, cotton floss, and silk embroidery ribbons. Vintage mother of perle buttons are sprinkled throughout the front and back of the cozy.

Hanky and Lace Collage: This is a Project by Design, and starts with a printed fabric, a hanky, and varying widths of vintage lace and jacquard ribbons. The collage design is embroidered with silk embroidery ribbon, silk, and rayon floss. Embellishments include rosettes, buttons, sequins, and beads.

For Elizabeth: This is a Stash Idea Inspiration piece, that started with a white cotton batiste handkerchief embroidered with the letter “E“, pieced with two colors of moire fabric. I dyed vintage lace and appliques with Colorhue dyes. I made ribbonwork flowers from vintage velvet and hombre woven ribbons. I worked silk ribbon embroidery stitches around the flowers and appliqués.

Hankies and Rosettes: This is a Stash Idea Inspiration piece, that stared with two cotton hankies, one with a crochet trim. I cut the hankies into quarters, and layered them on a vintage knitting pin. I covered the pin with an hombre ribbon, so that it would match the colors of the crochet trim, embroidery stitches, and the ribbon rosette flowers.

Here is a video that I shot at the C&T Publishing Studios, that focuses on the new book, and some of my favorite pieces.

Happy Stitching! ~Christen

Slow Stitchin’ on Sunday Mornings

In these posts I want to share some of my favorite pieces, which will include wall hangings, small works, pillows, purses, and just because pieces. This month they are going to be from my new book, Creative Embroidery, Mixing the Old with the New, by C&T Publishing.

Into the Garden: The base of this project started with a group of disparate fabrics, which included a collection of small strips of a few floral upholstery fabrics, two cuffs from a linen jacket, and a few squares of a printed polished cotton. I just started to randomly patch- and strip-piecing the base, fitting the pieces together, starting form small to large. Once the piecing was completed, I hand-quilted the base with perle cotton #12.

As I was contemplating my next move, I thought with all of the floral prints, this piece seemed to me to want to showcase a garden, with flowers, and birds, bugs, and more. I found some wonderful metal hangers, and some wooden clothespins, who doesn’t remember mom hanging the sheets out to dry in the warm summer sun?

I then rummaged around the button box, and found an eclectic mixture of old and new sew-through and shank buttons. I used the buttons as the centers for both the ribbonwork and embroidered flowers. A few were sewn as the body of the spiders and button bugs.

I found a great group of printed ribbons, burlap ribbon, printed rickrack trim, and vintage rickrack and loop trims. I used these as seam treatments, and for the ribbonwork flowers on the frame of the wooden hanger. I also found some rayon knitting ribbon and soutache braid for the stems of the flowers.

In the top left corner I stitched a sun, with rays shining down into the garden. Little stitched extras (which you can find in the book) include a birds nest, yo-yos, and penny circles. The little birds resting in the nest are made from spun cotton with beaks and wings made from dried mushrooms.

I filled the garden with buttons and charms of dragonflies, butterflies, and ladybugs. And of course spiders and their webs. I couched some old cotton twine for branches, on both the vertical edges, with a vine of couched silk ribbon to showcase the bright mixture of plastic, metal, and glass buttons.

I kept the embroidery fairly simple, so that the imagery could shine through. Included are: running stitch, chain stitch, stem stitch, couched stitch, lazy daisy stitch, fly stitch, French knot stitch, and straight stitch. You can find all of the embroidery stitches and the little stitched extras that I used in my book.

Here is a video that I shot at the C&T Publishing Studios, that focuses on the new book, and some of my favorite pieces.

Happy Stitching to you all! ~Christen

Friday’s Favorites: Flowers and Buttons in Baskets

What more can I say? I have a selection of pieces to show you today, from my upcoming book, Creative Embroidery, Mixing the Old With the New, by C&T Publishing. Some of the pieces are gallery examples, some are examples of the projects included in the book.

Doilies, appliqués, and wide flat lace can be used as a starting point to make a pretty basket that you can then fill with ribbonwork flowers, buttons, embroidery, charms, and beads.

Notions of Spring: A Stash Idea Inspiration piece. I cut a large doily in half, and used one half for the base. I cut a smaller doily into four sections, which created the heart shaped pieces in each corner. I filled the vase with the flowers and leaves included in the chapter Altering the Past. I even used and old tool that belonged to my mom, called the “Daisy Maker” which was used to make a flower from yarn. I substituted a lace hem tape for the yarn, and it worked out perfectly! I embellished the piece with several sizes of rickrack, a vine trim, a coronation cord, sewing notions, buttons, charms, and bells.

Lace, Doilies and Appliqués: Is one of the Projects by Design. I combined ribbonwork flowers, with fabric yo-yo’s, buttons, charms and beads to create a floral display. The project has two block designs, which are repeated, and then stitched into a 4-block wallhanging.

Flowers in a Cuff: Is a Stash Idea Inspiration piece. I hand-dyed the cuff, and the grosgrain ribbons that I used to stitch the ribbonwork rosettes. I had been saving those fun character buttons for years, waiting for just the right project to come along. I also used vintage dyed mother-of-perle buttons for the centers of the flowers.

Aunt Murt’s Garden: Is an example of the Stash Project called Scrap Pins. I used a section of vintage crochet lace for the basket, and stitched it onto a dyed silk base, finished with vintage flat lace. I stitched machine-made appliqués, vintage buttons, plastic leaves, glass roundels, and glass beads into and around the basket. I used a vintage knitting pin for the hanger.

Hoop Frame: This is a Stash Project. The base is a piece of decorator fabric set into a vintage hoop frame, which is adorned with a beautiful lace doily, and another piece of vintage crochet lace. I embroidered stems with the feather and couched stitch, leaves with the lazy daisy stitch, and French knot stitch details. The flowers are vintage mother-of-pearl and muscle shell buttons, with ladybug and dragonfly charms sprinkled throughout the bouquet.

Happy Stitching! ~Christen

A Heart a Day: 18

Heart Felt Wishes to you all! I love hearts, I love the shape, I love to decorate the house at Valentine’s Day, and I have a lot of hearts… so I decided to post A Heart a Day for the entire month of February.

“Love doesn’t make the world go round. Love is what makes the ride worthwhile.”Franklin P. Jones, Engineer

Happiest of heartfelt wishes for a wondrous day! ~Christen

A Heart a Day: 13

Heart Felt Wishes to you all! I love hearts, I love the shape, I love to decorate the house at Valentine’s Day, and I have a lot of hearts… so I decided to post A Heart a Day for the entire month of February.

My Crazy Valentine

It takes more than lace and ribbons,
And lovely verses too,
To make a Valentine that is nice enough for you.
It takes a world of special thoughts,
Tucked into every line,
And that’s exactly what you’ll find inside this Valentine.

Happiest of heartfelt wishes for a wondrous day! ~Christen

Tips and Tea on Tuesdays

On Tips and Tea on Tuesdays, I will cover a topic and hopefully provide you with some tips that will be helpful! And just as an afterthought, tea may occasionally be a cup of Joe!

cup of coffee

Tea today is as you can see, a mug of coffee. It is cold out, and I just wanted to have a sip of JOE. As I was sipping in my workroom, I came across some cardboard cones left over from a weaving project. I got to thinking about the shape, and thought, hmmm, this looks like it wants to be a tree. So I pulled out my ribbons, trims, lace, buttons, and started to play.

Tip: Wire Ribbon Cone Trees

  1. Buy a cardboard cone at your local craft store.
  2. Select the ribbon or ribbons that you want to use.
  3. Start at the bottom of the cone. Wrap the ribbon around the cone, cut off the length needed plus 1″.
  4. Place this onto the cone, with the bottom edge of the ribbon even with the bottom of the cone.
  5. Glue this end to the cone. Fold the remaining end over 1/2″, and pin.
  6. Wrap the length around the cone, remove the pin, and glue this end over the beginning end.
  7. Repeat this step, with the same ribbon or a variety of ribbons, slightly overlapping the previous row, until the cone is covered.
  8. Add a bow to the top, and small ornaments, or whatever strikes your fancy.

Tip: Lace and Rhinestone Cone Trees

  1. Buy a cardboard cone or a Styrofoam cone at your your local craft store.
  2. Select a 2 – 3 yard length of lace with one edge that has a ruffle.
  3. Start at the bottom of the cone. Pin one end of the lace to the cone with an appliqué pin, so that the ruffle is even with the bottom of the cone.
  4. Wrap the lace around the cone at a slight angle, slightly overlapping the previous row, and spiraling up the length of the cone.
  5. Cut off the excess lace at the top of the cone, plus 1/2″. Fold the edge over, and pin this to the cone.
  6. Using straight pins, decorate the tree with a length of rhinestone or pearl trim for a garland, or substitute an old rhinestone necklace.
  7. Pin a ribbonworked flower, or and old dress pin to the top of the cone as the tree topper.
  8. Pin buttons or old earrings in place with straight pins for the ornaments.

Happy tea drinking and stitching to you! ~Christen

PS: If you have any questions or thoughts, just leave a comment! See Tips, Tricks, the Basics, for more helpful ideas.

Friday’s Favorites: Decorating with Lace and Jewels

I love to decorate for the holidays. I have quite a collection of lace, buttons, and old jewelry bits, and try to find ways to incorporate them into my holiday decorations.

The first tree here, is actually a metal jewelry holder, with a bowl to catch your loose bits of stuff. I have used it to display my collection of vintage mercury glass ornaments and garlands. I placed vintage tinsel garlands in the bottom of the bowl, then nestled a collection of vintage swan shaped clip-on tree ornaments around the base of the tree. I gathered together a collection of vintage dress pins and single earrings, and added these throughout the branches.

The Lace Cone Trees, are resting in a silver leaf tray, with a garland of bells wrapped around the base. There are two vases flanking this group, filled with vintage mercury glass ornaments and vintage glass beads. See my Tips and Tea on Tuesdays post December 6, 2022, for directions on how to make a cone tree.

The Lace Christmas Tree hanging at the top of the picture is comprised of bits and pieces of lace that had been a salesman’s sampler. I added additional pieces of lace, and some vintage buttons. This project is a free handout that I am offering to my readers as a gift, from me to you.

Happy Stitching to you! ~Christen

Lace Christmas Tree: Free Handout

This felt project is fun, fast and easy to make for yourself or someone you love! Use up your tiny bits of precious lace, appliqués, and trims to create a hand-sewn collaged tree. The lace tree can be embroidered and embellished with stitches, buttons and more. It can be used as a pillow, or you could add a piece of ribbon to the top, for wall hanging.

You can download the free PDF handout here.

Happy Stitching ~Christen

Tidbits and Tats: class/tutorial

Tidbits and Tats: 1 lesson/$30.00

tidbitsandtats1

Tidbits and Tats is my version of the popular “snip rolls”. This is a fun, fast and easy project to make for yourself or someone you love! Perfect for you to use your tiny bits of precious lace, fabric, ribbon, appliques and trims to create a hand sewn collaged base. The lace base can be embroidered and embellished with buttons, sequins and charms. You can add in your own flare with other items such as fabric yo-yo’s and ribbonwork flowers.

tidbitsandtats2

Skill Level Beginning: hand-sewing and embroidery knowledge needed

Class Information

This class can be purchased at any time, there is no set schedule. The class can be ordered by contacting Christen: thestoreonthecorner@gmail.com. She will send you an invoice through PayPal.

Once the class is paid for, the supply list and handout/s will be sent out.

A high-speed internet connection is recommended, and you must have basic computer and internet skills. You will need to be able know how to download and save a document to your computer’s hard drive, open it, and print out a copy.

You can contact Christen with any questions pertaining to the class/class information throughout the length of the class.

Class fees will not be refunded.

Happy Stitching! ~Christen